The scoop on making loops – in 11 simple steps
Your drummer just came up with the rhythm pattern of a lifetime, or your guitarist played a rhythm guitar hook so infectious you think you might need to soak the studio in Clorox. And you want to use these grooves throughout a song, while cutting some great vocals on top.
There’s something about a loop that isn’t the same as the part played over and over again . . . and vice-versa. Sometimes you want to maintain the human variations that occur from measure to measure, but sometimes you want consistent, hypnotic repetition. When it’s the latter, here’s how to create a loop—from start to finish.
Note: If you use a Windows computer, you can “acidize” loops so that they follow tempo (and with some DAWs, pitch markers) with the free program, Cakewalk by BandLab. For more details, see the post Create Stretchable, Acidized Audio Files for Free.
1 CHOOSE YOUR PITCH
If you plan to use a loop in different keys, realize that pitch transposition places more demands on a stretching algorithm than time stretching. One solution is to record the loop in two or more keys.
Most stretch algorithms can handle three semitones up and down without sounding too unnatural. So, when I was recording loops for the AdrenaLinn Guitars loop library, I played each loop in E (to cover the range D–G) and Bb (for G#–C#).
In cases where it wasn’t possible to obtain the same chord voicing in the two keys, I used DSP-based time stretching to create the alternate version. This feature is available in several programs, and while files processed with DSP aren’t stretchable, the sound quality is good enough that you can create a loop from the transposed version.
2 PLAY AGAINST A BACKING TRACK
One of the easiest ways to create a loop involves grabbing part of a track from a multitrack recording. But when creating a loop from scratch, it’s difficult to give a good performance if you’re playing solo. Create a backing track to play against (a simple MIDI part is enough), and you’ll have a better feel.
3 RECORD AT A SLOWER TEMPO
Stretched files sound better when sped up than slowed down, because it’s easier to remove audio and make a loop shorter than try to fill in the gaps caused by lengthening audio.
Set the tempo for the right feel, and practice until you nail the part. But before hitting record, slow the tempo down (this is why I recommend a MIDI backing track—not only is it easy to change tempo, you can transpose pitch as needed, and quantize so you have a rhythmic reference). Typically, an Acidized/Apple Loops or REX loop can stretch (if properly sliced and edited) over a range of about –15\% to +60\% or higher. So, a 100 BPM loop will be viable from about 85 BPM to over 160 BPM. For really downtempo material, like some hip-hop and chill, consider cutting at 70 or 80 BPM instead.
As a bonus, you may find it easier to play the part more precisely at the slower tempo; also, any timing errors will become less significant, the more you speed up the loop.
4 TO SWING OR NOT TO SWING
There are two opposing viewpoints about whether to incorporate swing and other “grooves” in a loop, or go for rhythmic rigidity. Some feel that if a loop wants to swing, let it. Unless it has a huge swing percentage, it will usually play okay against something recorded without swing. However, modern DAWs often let you apply swing and groove templates to audio, so there’s a trend toward recording loops to a rhythmic grid so they can be modified within the DAW for swing and other grooves.
5 HOW MANY MEASURES?
Although quite a few loops are one measure long, two-measure loops “breathe” better—the first measure is tension, the second is release. (For more thoughts on this subject, see How to Create Better Beats.) Four-measure loops work well for sounds that evolve over time. Eight- or sixteen-measure loops are more like “construction kits” which you can use in their entirety, but from which you can also extract pieces.
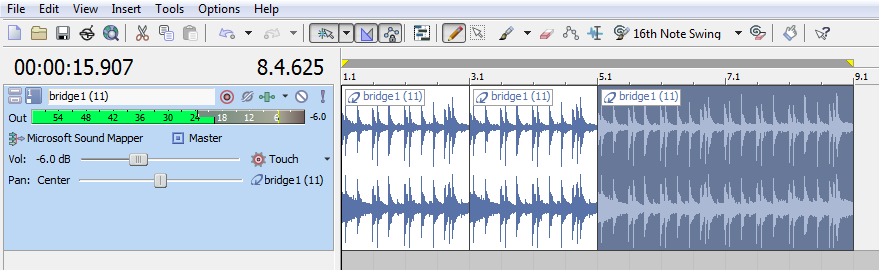
It’s easy to shorten a long loop. For example, if you create a four-measure loop that builds over four measures but want to build over eight measures instead, split the loop in the middle, repeat the first two measures twice (to provide the first four measures), then play the full four-measure loop to complete the eight-measure figure (Fig. 1).
6 CUTTING THE LOOP
One of the best ways to create loops is to record for several minutes, so you have a choice of performances. Most DAWs let you create a loop bracket and slide it around to isolate particular portions of the track. You can also experiment with changing the loop length—you might find that what you thought would be a one-measure loop works well as a two- or four-measure loop, which gives some subtle, internal variations.
After deciding on the optimum length, use the loop brackets to zero in on the best looping candidates. Say you’re recording rhythm guitar. Solo the track, and listen to the entire rhythm guitar part. Mark off regions (based on the number of measures you want to use) that would make the best loops.
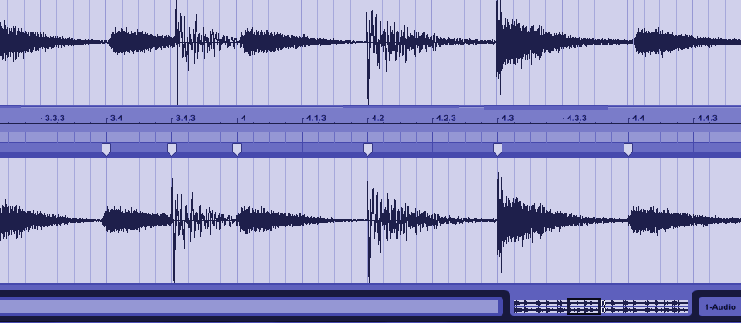
After locating the best one, cut the beginning and end to the beat. With human-played loops, neither the beginning nor end will likely land exactly on the beat. Zoom in on the loop beginning, and slide the track so that the loop’s beginning lands exactly at the beginning of a measure. Snap the cursor to the measure beginning, and do a split or cut. You’ll also need to cut at the end of a measure; if the loop extends past the measure boundary or ends before it by a little bit, turn off snap and cut at the end of the loop. Then turn snap back on, and use the DAW’s DSP stretching function to drag the end of the loop to the measure boundary. How to do this varies depending on the program, but it generally involves click-dragging the edge of the audio while holding down a modifier key, like Ctrl or Alt.
If you hear a click when the loop repeats because there’s a level shift between the loop start and end, add a very short (3-10 ms) fade at the loop start and end.
7 PROS AND CONS OF AUDIO QUANTIZATION
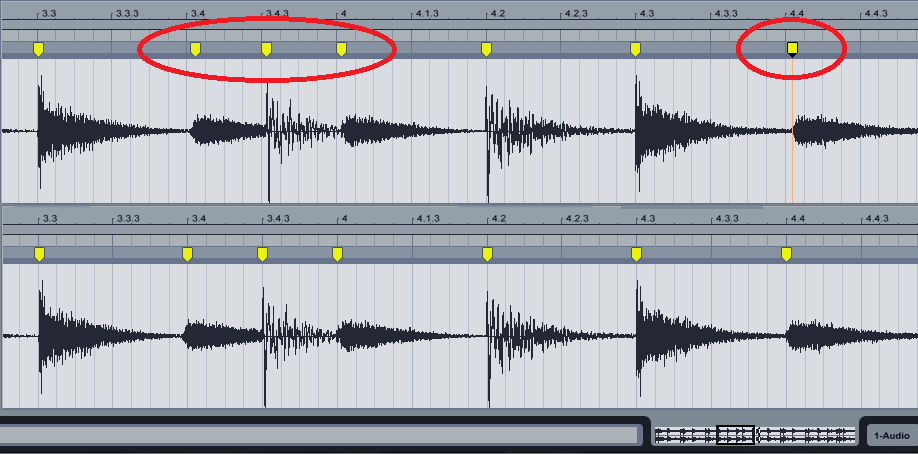
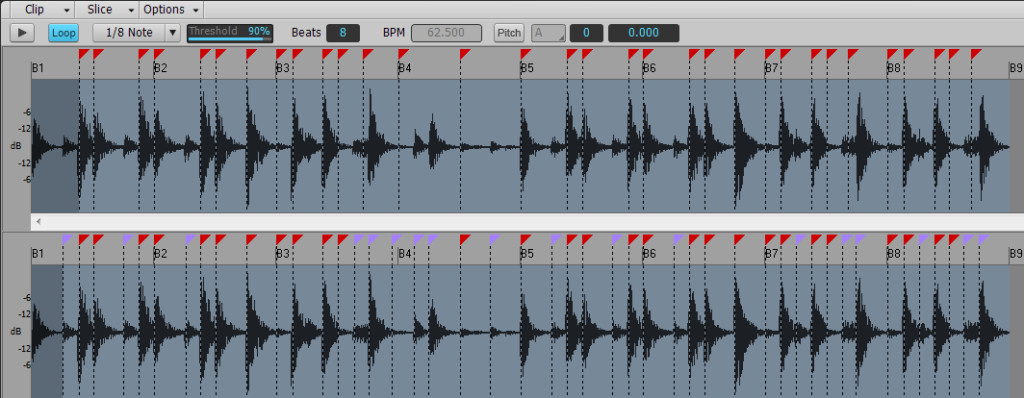
Now scan the loop for note attack transients and see if they line up properly with note divisions. Small timing differences are not a problem and, if done musically (e.g., a snare on a loop’s last beat hits just a shade late), will enhance the loop. But if a note is objectionably late or early, you can use an audio quantization function (like Ableton’s Warp as shown in Fig. 2) to quantize the audio.
If this degrades the fidelity, another option is to isolate the section that needs to be shifted by splitting at the beginning and end, then sliding the attack into place. If this opens a problematic gap between the end of the note you moved and the beginning of the next note, try the following:
- Add a slight fade to the first note so it glides more elegantly into the gap.
- Copy a portion of the first note’s decay, and crossfade it with the note end to cover the gap.
- Use DSP stretching to extend the decay of the note you moved forward in time.
If the note was early and you shifted it later, then there will be a gap after the previous note, and the end of the note you moved might overlap the next note. If the gap is noticeable, deal with it as described above. As to the end, either:
- Shorten it so it butts up against the beginning of the next note.
- Crossfade it with the next note’s beginning if there’s no strong attack.
- If you’ve edited the loop, you’ll need to make it one file again. Bounce the region containing the loop to another track, bounce into the same “clip,” or export it and bring it back into the project.
8 CONSIDER SOME PROCESSING
A “dry” loop is the most flexible — if you add reverb, then the stretching process has to deal with that. Cut a dry loop instead, and add reverb once the loop is in your DAW.
If an effect such as tempo-synced delay is an integral part of the loop, embed the effect in the file for a “plug and play” loop. Otherwise, add the effect during playback.
Some people “master” their loops with compression and EQ so the loops really jump out. But when you record other tracks (vocals, piano, etc.) then master the song, if you want to squash the dynamics a bit, then the loop dynamics will be super-squashed, and if you add a bit of brightness, the loop will shatter glass.
If there are response anomalies I’ll often add a little EQ, and just enough limiting to tame any rogue peaks, but that’s it. Loops fit better in the track that way, and are more workable when it’s time to mix and master. You can always add processing more easily than you can take it away.
9 CHOOSE YOUR STRETCH METHOD
The three main stretchable audio formats are Acidized WAV files, Apple Loops, and REX files. REX files are arguably the most universally recognized, with Acidized WAV files a close second. Mac programs generally recognize Apple Loops, but few Windows programs do. Several programs on both platforms recognize Acidized files.
Different formats are best for different types of audio. REX files are optimum for percussive audio, as long as prominent sounds don’t decay over other sounds (e.g., a cymbal that lasts for a measure sounding at the same time as a 16th-note hi-hat pattern). A single-note bass line or simple drum part is the ideal candidate for REXing. WAV and Apple Loops aren’t always as good for percussive sounds as REX files, but are better with everything else—particularly sustained sounds.
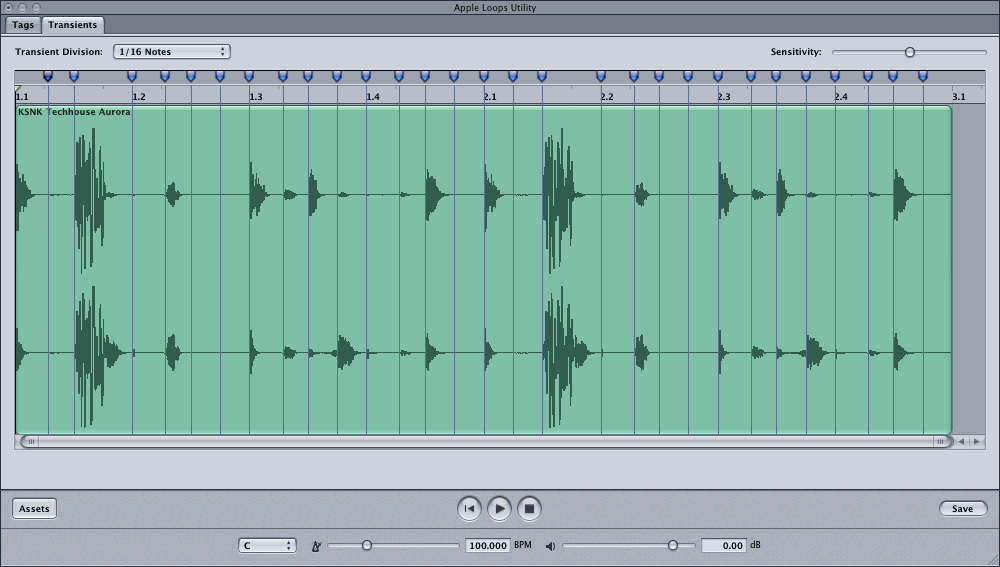
Your software will likely influence your choice. Apple’s Apple Loops Utility (Fig. 3) is a free program for creating Apple Loops; to obtain a copy, register as an Apple developer (it’s free) at https://developer.apple.com/downloads/, then search for “Apple Loops” and download the Apple Loops Utility SDK. To create Acidized fles, you’ll need either Magix Acid, Magix Samplitude, or Cakewalk by BandLab. Creating REX files requires Propellerhead Software’s ReCycle program. Note that with any of these formats, creating stretchable files capable of working over a wide tempo range is a very specialized skill—so expect to do lots of trial and error.
10 CREATE AN ACIDIZED OR APPLE LOOPS VERSION
Acidized and Apple Loops are structurally quite similar, and the techniques that help turn a file into a stretchable loop are similar. Basically, there need to be transient markers at the beginning of each attack transient to turn the loop into a series of slices, each of which represents a distinct “blob” of sound (e.g., kick+snare, bass note, or whatever).
The programs themselves take an educated case as to where these transients need to go, but manual optimization is almost always necessary to create a loop that stretches over the widest possible range. A non-optimized file will cause artifacts when stretched (e.g., doubled attack transients that sound like “flamming,” and/or a loss of some of the fullness from percussion). Optimization (Fig. 4) involves several steps.
- Existing strong transients should all have a marker at the transient’s precise beginning. Zoom in if needed to see the transient.
- Secondary transients, such as those caused by a delay or flam, should have markers as well.
- Remove spurious markers (i.e., they don’t fall on transients) as they can degrade the sound.
- With sustained material, add a transient marker at a rhythmic interval like a quarter note or eighth note. This tells the DSP to create a crossfade to help make a more seamless transition; putting it on a beat means that other sounds will likely mask any sonic discontinuities that may result from the stretching process.
- If you hear a “fluttering” effect during sustained notes, try adding another marker in the middle of the note.
- Sometimes adding a marker at the end of a note’s decay prevents roughness toward the note’s end.
- Enter the root key for pitched loops. This allows the loop to follow key changes in the host program. For percussive parts, specify no root key so that only the tempo changes.
- Transients are not always obvious. For example, a tom fill and cymbal crash might play simultaneously at the end of a drum loop, so you can’t see the individual tom transients. Listen to the part: If there’s a hit every 16th note, then just place a marker at every 16th note. If it’s mostly 16th notes but there are some hits that extend over an 8th note, add hits for the 16th notes but omit them for the sections that are longer.
11 REX FILE TIPS
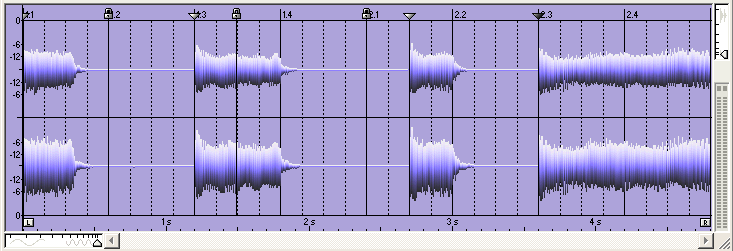
If you want to create a REX file, import the loop into ReCycle. The basic principles of good stretching are the same as for Acidized/Apple Loops files—you want to identify where transients fall—but with REX files these are hard cuts (Fig. 5), not just markers for the DSP to reference. Creating good REX files is an art in itself that goes beyond the scope of this article, but the tips given above regarding Acidization and Apple Loops should help considerably.
If you followed the above directions and optimized your loops, they should work with a variety of material over a wide range of tempos, while fitting perfectly into a song—and that’s what it’s all about.
RELATED ARTICLES
How to Get Started with Loops Loops aren’t just for Djs—whether you favor hardware or software, loops make it easy to explore new types of inspiration for songwriting and performing.
5 Tips for More Exciting Loop-Based Music Loop-based music isn’t only for Djs—loops can work in rock, movies, and more. With a little editing, you also add a lot of interest to loop-based music.
Make Your Own Drum Loops Why sound like everyone else? Create your own drum loops, and then you won’t have to settle for what other people think would work well with your music.
16 Loop Library Tips Now that Cakewalk is free, you can download it to take advantage of the ability to create stretchable loops, with features not found in other programs.
5 Ableton Live Tips From improving laptop efficiency in live performance, to a free wireless remote, to a metronome makeover, these tips help take Ableton Live even further.