
These tips for Cakewalk will help you get the most out of loops
Cakewalk, in its original incarnation as Sonar, was one of the first programs to give loops the respect they deserve. It still offers many unique options not found in other software, and because the program is now free, you can download it and take advantage of how it works with loops, even if you use a different Windows host . Here are some ways to get the most out of loops in Cakewalk.
1. Cakewalk’s native time/pitch-stretchable format is the Groove Clip, which is essentially identical to the Acidized file format developed by Sony and used in the Big Fish libraries.
2. Groove Clips have Pitch metadata that indicates the loop’s key. Big Fish Audio’s construction kits typically include the key in the name of the kit’s folder. For the Groove Clip to play back at its originally recorded pitch, Cakewalk’s project Default Groove Clip pitch should be set to the same key (see the featured image above). Otherwise, the clip will be transposed. For example if the Groove Clip’s native pitch is A and the default Project Groove Clip Pitch is G, the Groove Clip will play back at G.
3. Groove Clip Pitch Change markers tell the Groove clip to transpose. For example, if a Groove Clip’s pitch is A, and halfway through the clip it encounters a pitch change marker that’s set to G, the Groove Clip will transpose to G regardless of the project’s Default Groove Clip Pitch.
4. Turning off the pitch metadata turns off the ability to follow pitch markers, which is what you usually want with unpitched sounds like drums, percussion, etc. You can also turn off following pitch markers in the Loop Construction View; chooseClip > Loop Propertiesand uncheckFollow Project Pitch. Drum loops will not have pitch embedded, but hey—live dangerously! You can enter native pitch information for instruments like percussion in the Pitch field so they change their pitch as the song changes—check Follow Project Pitch.
5. Cakewalk’s Browser makes it easy to audition loops. Click on the Media drop-down media, and check what’s appropriate to your needs: Auto-Preview (a file starts playing as soon as you click on it), Preview at Host Tempo (files will play back as Groove Clips at the host tempo, although marker placement may not be optimized), and Loop Preview (plays the file as a loop, not a one-shot).
6. Cakewalk’s Browser can play back multiple loops if they’re within the same folder—great for auditioning construction kit loops—and they’ll sync together. Ctrl-click on a file to add it to the files currently playing.
7. The fidelity of a stretched Groove Clip depends on three factors: How far the pitch varies from the native pitch, how far the tempo varies from the native tempo, and how carefully the markers have been placed to define transients. Fortunately, the editing in the Big Fish Audio core library allows for stretching over a wide range. However, sometimes additional editing will allow for stretching at “corner case” tempos and transpositions. Proper editing is an art and a science; Cakewalk and Sony Acid are the only DAWs that allow creating, editing, and saving Acidized files.
8. You don’t always need pitch markers to handle frequent pitch changes. Suppose you have a 4-measure loop and you want to go from tonic to flatted 7th every two beats. Choose Slices > Show/Hide Pitch Envelope (it’s the blue line in the center, but I’ve colored it white in Fig. 1 so it’s real obvious).
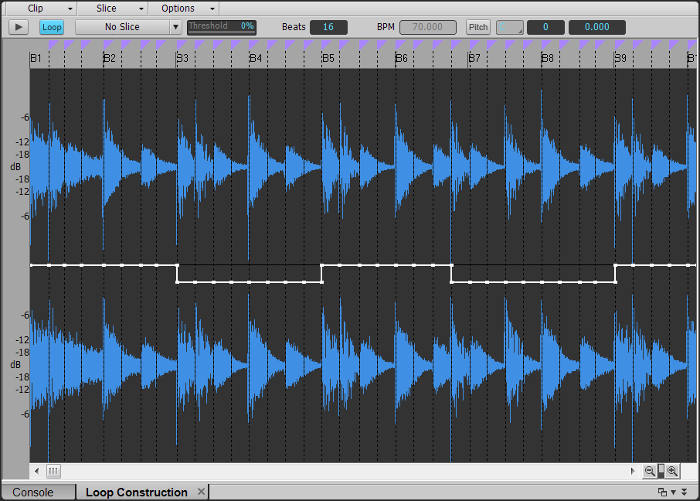
You can adjust the pitch for each slice, so in this example for beats 3+4, 7+8, etc. transpose those slices down 2 semitones. Now the loop will follow those pitch changes without needing markers.
9. If you change a loop’s metadata and want to save it, the only way to save a Groove Clip and retain the metadata is from the Loop Construction View. If that window has the focus, type F to open a dialog box for saving. Or, chooseClip > Save Loopfrom the Loop Construction View menu. Note that dragging the Groove Clip to the Browser or desktop removes the metadata.
10. Stretchable files lose more fidelity when slowing down compared to speeding up. This is because new material has to be created to lengthen the file, whereas simply removing material can shorten a file. With proper transient editing, it’s fairly easy to cover a range of -10% to +180%. For example, a file with a native tempo of 100 BPM will likely be able to cover the range of 90 to 180 BPM reasonably well.
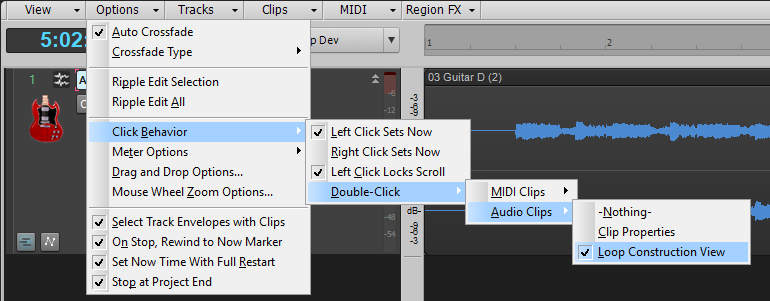
11. To open up the Loop Construction View as the default when double-clicking an audio clip, choose Options > Click Behavior > Double-Click > Audio Clips > Loop Construction View (Fig. 2).
12. Loops have some limitations with respect to processing.
- DSP processes like Gain and Normalize have no effect on Groove Clips.
- Clip automation does have an effect, but it is an overlay on the Groove Clip, not part of it, so it will not “roll out” when you roll out the clip (however, the last automation node value will be respected by subsequent iterations).
- Creating a Melodyne (or other) region effect with a Groove Clip converts it to a standard WAV file; even after removing the region effect, it will remain a standard WAV file.
- You can insert an audio effect into a Groove Clip’s FX Rack. If you split the Groove Clip, the effect will remain in both splits, and you can still roll out the Groove Clip and retain the effect.
13. You can similarly show/hide Pan and Gain envelopes, but there are two caveats. There’s no way to “round off” when the pan or gain switches, so you want to do so when a slice marker is in a silent section, or at least at a zero-crossing. Also, Pan works only with a stereo clip, and acts more like a balance control.
14. Loops stretch tempo more convincingly than pitch; pitch stretches of more than a few semitones generally don’t sound very good, especially with low frequencies. In those cases, after your arrangement is more or less done, make sure the clip isn’t transposed and bounce it to itself. This converts it into a standard WAV file, but that doesn’t matter because the arrangement is done and you won’t need to change its tempo any more. At this point, use the Process > Transpose DSP function to change the pitch with much higher fidelity.
15. If auditioning a loop with “Preview at Host Tempo” and “Loop Preview” selected from the Browser’s Media drop-down menu doesn’t sound very good, try tweaking the slicing in the Loop Construction View to see if that helps.
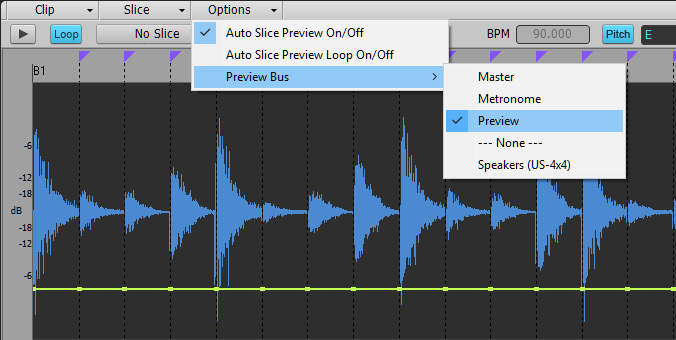
16. Don’t hear a peep out of the file in the Loop Construction window when you click on the Play button? Choose Options > Preview Bus and make sure the audio has a place to go where you can hear it, and also, that the bus chosen for Preview doesn’t have its volume down or is muted (Fig. 3).
RELATED ARTICLES
How to Get Started with Loops Loops aren’t just for Djs—whether you favor hardware or software, loops make it easy to explore new types of inspiration for songwriting and performing.
How to Create Loops from an Audio File Sometimes you want human variations, but sometimes you want hypnotic repetition. For the latter, here’s how to create a loop—from start to finish.
Make Your Own Drum Loops Why sound like everyone else? Create your own drum loops, and then you won’t have to settle for what other people think would work well with your music.
5 Tips for More Exciting Loop-Based Music Loop-based music isn’t only for Djs—loops can work in rock, movies, and more. With a little editing, you also add a lot of interest to loop-based music.
5 Ableton Live Tips From improving laptop efficiency in live performance, to a free wireless remote, to a metronome makeover, these tips help take Ableton Live even further.