Check out these basics before you click on “record”
There are many options for recording guitar, from miking an amp, to recording direct, to combining the two…or even use multiple cabinets or multiple mics. These techniques will help get you started – then experiment to create your own special sound.
SET UP THE GUITAR PROPERLY
The type of guitar, choice of pickups, string material, and tone control settings make a huge difference in the overall recorded sound. Get as close as you can to the sound you want by working with these options first, then start experimenting with the mic and amp. Check intonation prior to the session (and whenever you change a string), and check tuning constantly: It’s virtually impossible to fix an improperly tuned or intoned guitar in the mix.
MINIMIZE ELECTRICAL INTERFERENCE
Power supplies, transformers, dimmers, and other sources of EMI (electro-magnetic interference) can get into your guitar’s pickups. Turn all dimmers full on or full off. Turn off any gear that isn’t being used. Experiment with the guitar’s orientation with respect to other gear, and choose the position that gives minimum interference.
CHOOSE THE RIGHT MICROPHONE TYPE
Dynamic mics (like the Shure SM57) are the “old standby” as they can handle high power levels and have a naturally “warm” tone that complements amps. Large-diaphragm condenser mics are also popular, typically with any pad switch engaged due to a greater difficulty handling extremely high SPLs compared to dynamics. They also tend to give brighter highs and lower lows. Newer ribbon mics are gaining popularity for miking amps (the Royer Labs 121 is a very popular choice) because they’re not as fragile as older ribbon types. They tend to pick up more room ambience, but do remember that excessive levels can damage ribbon mic elements.
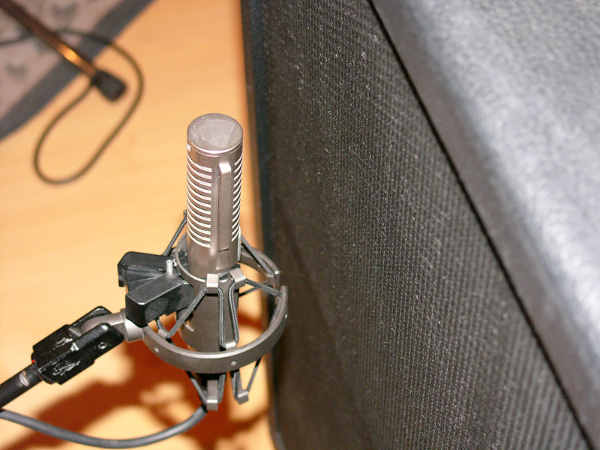
POSITION THE MICROPHONE
The relationship of the mic to the amp speaker has a major effect on the sound. Pointing the mic directly at the speaker gives more highs than angling the mic, as a mic’s off-axis response tends to pick up fewer high frequencies. However, where you point the mic also matters; for example, pointing toward the outside of the speaker may give a “tighter” sound than pointing at the center. Also, if a cabinet has multiple speakers, try each one—not all speakers, even ones from the same production run, are identical. The distance from the amp also makes a difference. Placing the mic further away from the speaker picks up more room sound and ambience. For best results, listen in the control room while someone else adjusts the mic; or, adjust the mic yourself, while saying what you’re doing (“Mic pointing at cone, 2″ away). Listen back to which sounds best, then re-create the setting you described.
TIGHTEN THE SOUND WITH MIC LOW PASS FILTERS
Engaging a mic’s low pass filter, if present, can “tighten up” the sound as it usually affects frequencies below the range of the guitar. This reduces hum and room rumble but shouldn’t alter the guitar tone.
RECORD DIRECT WITH AN AUDIO INTERFACE
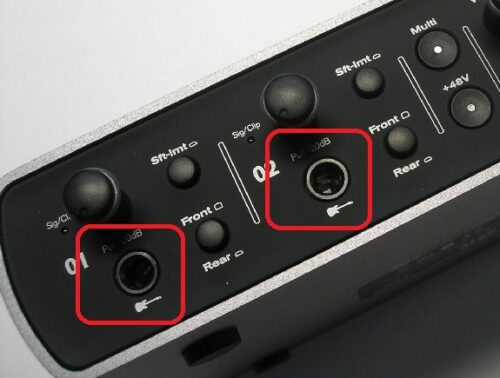
To preserve your guitar’s high frequency response and output level, record into an input with a high impedance (at least 100, and preferably 220, kilohms). Many audio interfaces have an “instrument input” for this purpose. Standard passive direct boxes may not be suitable. If you’re using stomp boxes or other effects prior to your audio interface, its impedance is not an issue: Impedance matters only for the first device “seen” by the guitar.
COMBINE DIRECT AND MIKED SOUNDS
The sound coming from the mic will be delayed compared to the direct sound (approximately 1 millisecond of delay for each foot of distance between the mic and speaker). Combining the direct and miked sounds may sound “thin” due to the comb filtering caused by this time difference. In a DAW, temporarily pan both mics to center and nudge the miked sound forward (earlier) in time to compensate; compare the mix of the two sound sources until you achieve the best tone.
USE MULTIPLE CABINETS FOR STEREO IMAGING
It’s common to set up two (or more) cabinets and mic both. Variations in the cabinets and miking create a convincing stereo spread when one cabinet is panned more toward the left and the other panned more toward the right.
TRY MULTIPLE MICS
There are two main applications for multiple mics. One is to have a mic (or mics) close to the amp, and one or more mics in the room to pick up ambience and reflections. The other is to place two mics on a single amp and vary the blend between them to create a particular sound. In the latter situation, it’s common to use very different mics (for example, a dynamic and a condenser). During mixdown these can be set to different levels, have one thrown out of phase compared to the other to give “pseudo-EQ” effects, and possibly even have different processing, to create a sound that’s very different compared to using a single mic.
BIG AMPS VS. LITTLE AMPS
Using a big amp and cranking it to get your “sound” will also put lots of reflections into the room where you’re recording, and when these are picked up, may give an overly-diffused effect. You may obtain better results by cranking a small amp, which may sound the same to the mic but not be as loud. This may also be a necessary solution if you’re recording in a location where noise can bother others.
USE RE-AMPING FOR SUSTAIN
Re-amping involves recording a dry guitar sound to a DAW, then running it through an amp or amp simulator plug-in on mixdown to allow choosing the perfect tone for the track. However, it also makes sense to play through an amplifier and record both the amp and dry guitar sounds. The amplifier can give more sustain, or even controlled feedback; and if you like the sound, you can always use it and not have to bother with re-amping. An added bonus is that the amp sound will often make a good complement to the re-amped sound, and facilitate creating a stereo image.
Hi, this is a comment.
To delete a comment, just log in and view the post's comments. There you will have the option to edit or delete them.