Modulation is key to making expressive, interesting sounds
Synthesizers have brought the potential for greater expressiveness to keyboards. Although pianos and organs can produce complex and interesting sounds, synthesizers offer control over multiple parameters via mod wheel, bend, expression pedal, velocity, aftertouch, etc. that let you get “inside” the sound and modify it in real time.
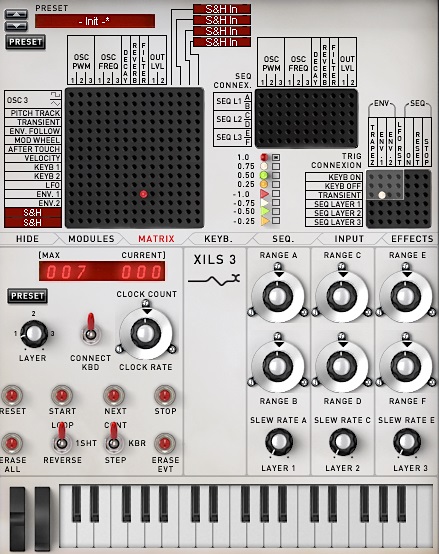
Digital synths took the modulation process to a whole other level by introducing the modulation matrix. Visually, the matrix usually consists of rows of outputs from modulation sources and columns of inputs (filter cutoff, VCA level, envelope attack time, LFO rate, etc.), very much like the pin matrix in the EMS VCS3, one of the very earliest synthesizers. The image above isn’t an actual VCS3, but a software emulation from XILS. The pin matrix that patched modules together is in the upper left.
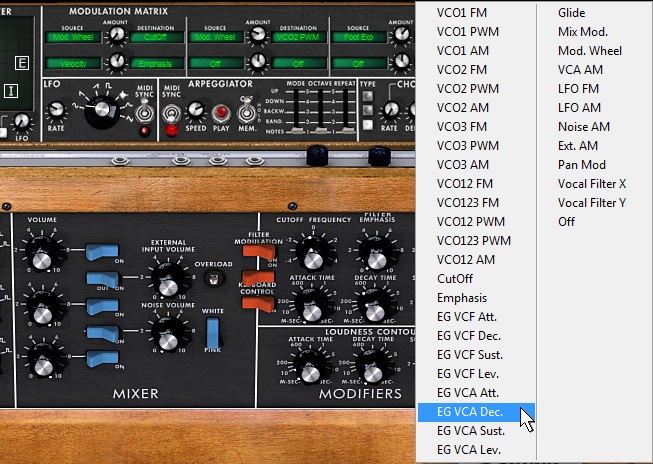
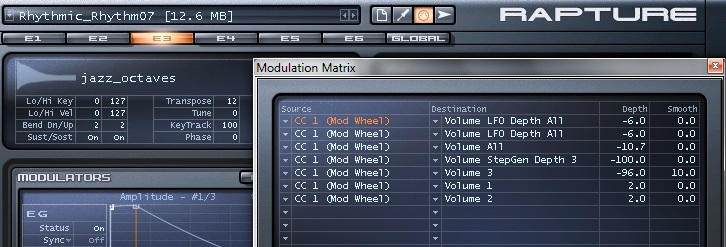
In sophisticated implementations, the crosspoint where a row meets a column lets you adjust the modulation source’s output level, polarity (positive- or negative-going), and sometimes additional options like range, smoothing, or logarithmic/linear response. However, matrix modulation doesn’t always have to be arranged like a matrix; for example, drop-down menus can choose sources and destinations.
As most soft synths don’t know what controller you’ll use, factory patches rarely assume the presence of footpedals, aftertouch, and other controllers, and often limit modulation to what people expect (no, Congress did not pass a law requiring mod wheels to adjust only vibrato). But why be normal? Here are several ways to exploit modulation to increase sonic expressiveness.
MOD WHEEL WITH SYNTH BASS
I rarely use vibrato with synth bass, which frees up the mod wheel to control filter cutoff so the bass can lay back in the track or grab attention. This is even more effective if turning up the mod wheel increases the amount of modulation from a filter envelope. Mod wheels also excel for bringing in a sub-octave sound behind a bass line.
MOD WHEEL FOR SOUND MORPHING
Some soft synths are sophisticated enough that you can build two entirely different patches, and morph between them with the mod wheel by tying it to multiple parameters.
In many cases this is far more expressive compared to switching patches because you can build a sonic change over time. If the two patches sync to host tempo, you can even do DJ-style crossfading to produce some wild, tempo-synched effects.
AFTERTOUCH FOR GUITAR-LIKE FEEDBACK
One of the coolest guitar sounds is when a feedback sine wave kicks in an octave + fifth above the fundamental. So, program a sine wave oscillator for this sound, with amplitude controlled by aftertouch so the “feedback” sound lies dormant until you mix it in with aftertouch. If the aftertouch response is too “touchy,” a footpedal or mod wheel will also do the job.
For a variation on this theme, have pressure introduce vibrato at maximum pressure. Also experiment with other waveforms and pitches for the “feedback” sound; a sine wave tuned an octave and a fifth above the fundamental can also work well. Finally, there’s no reason to restrict this technique to guitar sounds—try “feedback” cello sometime.
USE SAMPLE START MODULATION FOR DYNAMICS
This is a common application for drums, but is worth repeating because modulating sample start time can add extremely dynamic effects (particularly with plucked, bowed, or percussive instruments). Program a sample start time several milliseconds into the sample, then use negative-going velocity so that higher velocities trigger the sample closer to its beginning. If increased velocity also opens up the filter a bit for a brighter sound, the dynamics will be even more compelling.
REINFORCE THE FUNDAMENTALS OF NOTES
Layering a sine wave tuned to a sample’s fundamental (or an octave lower) can add considerable strength and power. This is really obvious with piano samples; layer a sine wave at the same pitch but mixed behind the main waveform, and the piano will acquire a more commanding low end. For example, control the sine wave amplitude with a footpedal, then add in the sine wave for the big chorus.
MORE EXPRESSIVE HARD SYNC
Using an envelope for hard sync is the norm, but changing the pitch of the oscillator reset by the hard sync with a footpedal, aftertouch, or mod wheel can be far more expressive.
USE THE PITCH ENVELOPE WITH CHOIRS AND WIND INSTRUMENTS
Human voices and wind instruments rarely hit right on pitch, but “settle in” to the pitch over a short period of time. So, set a pitch envelope for no attack and a short decay, then use negative modulation so the pitch sweeps upward from below pitch to normal pitch. Optionally, add velocity control over the pitch envelope amount so that hitting the keys harder creates more of a pitch shift. The overall effect needs to be subtle, almost subliminal—if the sound is less “human” when you remove the pitch envelope. you’re there. With a layered choir, the effect will be even more realistic if one layer bends slightly up to pitch while another bends slightly down or stays constant.
USE THE PITCH ENVELOPE WITH PLUCKED AND STRUCK SOUNDS
Plucking a string hard or hitting a drum head raises pitch slightly at first. Run a pitch envelope to the oscillators set for no attack and short decay, with velocity-controlled envelope level. With acoustic instrument emulations, the pitch bend should occur only when you hit the keys really hard. However, you can also make percussive sounds very “electro” by using a high-amplitude envelope with an extremely short attack time. This adds a “blip” attack to the beginning of percussion sounds that really helps them stand out in an electronic mix.
USE FOOT-CONTROLLED ENVELOPE TIMES
A footpedal is a great way to vary an amplitude envelope’s attack or decay time. With string patches, varying attack allows fading in a pad over a variable amount of time, whereas varying decay is perfect for making a bass line more or less staccato to match what the music requires. Also, changing an open hi-hat’s decay time via footpedal can give a smooth open/closed hi-hat response.
LFO WAVEFORM CROSSFADES
Use the same LFO, set to a relatively slow rate, to control the amplitude of two different waveforms. Set the LFO amount to full positive modulation for one waveform, and full negative modulation for the other to crossfade between the waveforms. This provides an animated, non-static sound if you choose related and sustained waveforms (e.g., two different organ samples, or two pulse waves with different duty cycles).
MODULATE PANNING WITH MIDI NOTE NUMBERS
Modulating panning by MIDI note number (low notes on the left, high notes on the right to simulate “performer position”) is a common technique, but with percussion instruments that have very short decays like clave or cowbell, try modulating pan position with velocity. This makes the instrument appear at different places in the stereo field, but you probably won’t hear it actually pan because of the short decay…it’s more like the sound bounces around in stereo.
RELATED ARTICLES
How to Emulate Feedback Guitar with Synthesizers
How to Morph Within Presets for More Expressiveness