Knowing some important tweaks for the MIDI part driving the bass creates more realistic parts
Several people have commented that the keyboard bass parts in my music sound like “real” bass. Although I do play bass, most of the time I prefer keyboard bass because I’ve sampled so many basses it’s always possible to find a suitable bass sound. However, it's important to play a keyboard bass part within certain constraints so that it has the feel, not just the sound, of an electric bass.
AVOID OVERLAPPING NOTES
Most bass lines are single notes, and because bassists lift fingers, mute strings, and pick, there's going to be a space between notes. Go through your MIDI sequence note by note, and make sure that no note extends over another note's attack (Fig. 1).

This also improves the bass's tone. When notes collide, they intermodulate in a way that removes a note's power. Bass already lives in a difficult part of the frequency spectrum, because our ears aren't as sensitive in the bass range. Two notes playing at the same has a "blurring" effect, unless they're fifths or octaves.
LIMIT MIDI VELOCITY
Really great bass players are known for their "touch"—the ability to play notes consistently, in terms of timing and dynamics. In some ways, it can be harder to play keyboard notes consistently than bass strings, but MIDI velocity limiting is a fine solution. For more information, please see the article How to Limit MIDI Velocity.
Use slides. Real bass players use a lot of slides in their playing, and using pitch bend to create slides can benefit MIDI bass as well. Set the bass synth's pitch bend range to plus and minus a fifth or an octave, depending how much of a slide you want—I use plus and minus one octave.
TAKE ADVANTAGE OF SYNTH PARAMETERS
Use velocity not only to control amplitude, but brightness—have a lower filter cutoff at lower velocities, and use velocity to modulate the filter cutoff so that hitting the keys harder creates a brighter sound.
Modulating the sample start time can also add dynamics. I usually avoid multisampling individual notes, because switching between different samples often creates an obvious discontinuity. Instead, I sample notes picked really hard, and set the initial sample start later than the attack. Higher velocities move the sample start earlier, which lets through more of the attack.
The only limitation with modulating sample start is that the start may not occur on a zero-crossing, which can produce a click. The simplest fix is adding 1 or 2 milliseconds of attack time to the amplitude envelope.
MIDI TIMING
One of MIDI bass’s big advantages is being able to tweak timing. Traditionally, kick and bass compete for the audio spectrum’s low end, and because bass is non-directional on playback, they’re both panned center—so they potentially obscure each other even more.
To emphasize the bass and the melody, move the bass a few ticks ahead of the beat, but not enough to hear any kind of delay. To emphasize the kick and rhythm, move the bass slightly late. Even without an actual level change, the bass sounds softer when late, and louder when ahead.
BASIC SLIDES
Part of creating realistic bass parts is playing parts that a bassist would (and could!) play, which means including credible slides. Slides are an important bass technique—not just slides up or down a string, but over a semitone or more when transitioning between notes. For example, when going from A to C, you can extend the A MIDI note and use pitch bend to slide it up to C (remember to add a pitch bend of 0 after the note ends).
I also sample actual bass slides, like a slide down from the 12th fret to the open string for the B (if a five-string bass), E, A, D, and G strings. Similarly, I sample up/down slides that start with the open string, slide up to an octave higher, then slide back down again. Adding these in from time to time add a seriously authentic feel to sampled bass parts.
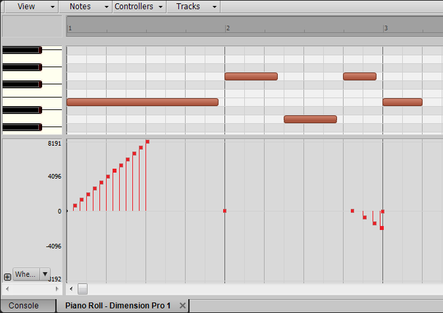
USE STEPPED SLIDES TO EMULATE SLIDING OVER FRETS
Unless you’re emulating a fretless bass, you want a stepped, not continuous, slide to emulate sliding over frets. Quantizing pitch bend slide messages so they’re stepped is one solution. In the screen shot above, the first slide goes in half-steps from tonic to an octave higher. The second one slides from G to E and steps down over three semitones. The pitch bend then returns to 0 before the next E plays.
Even if they’re not exact half-steps, they go by fast enough to be perceived as non-continuous. For example, with a virtual instrument’s pitch bend set to +/-12 semitones, quantizing the bend to 1/32nd triplets will give exactly 12 steps in a one-beat octave slide up, while a 1/16th note triplet gives 12 steps over a two-beat octave slide. Make sure there’s no smoothing enabled for the pitch bend function.
DO PRECISE "FRETLESS" SLIDES WITH PITCH BEND
For precise slides, the table in Fig. 2 shows the amount of pitch bend change per semitone. For example if an octave is a pitch bend value of 8191, and you want to start a slide three semitones above the note where you want to “land,” start at a pitch bend value of +2048 and add equally-spaced events at +1366, +683, and just before the final note, 0. This assumes your virtual instrument has a +/-12 semitone pitch bend range, which is what I use for bass to make these kinds of slides possible.

AUDIO EXAMPLES OF SAMPLED BASS PLAYING TECHNIQUES
To hear the sound of these techniques and sampled bass in action, the following song collections all use sampled bass sounds exclusively.