Audio compression can give more consistent levels, but it can’t give a more consistent “touch”
Obtaining a more consistent touch from an instrument has to happen at the source, when the instrument play, rather than after-the-fact audio compression. Some recording software programs have either MIDI FX or editing commands to compress data by raising low-level notes and/or or reducing high-level notes. But if your program doesn’t have velocity compression, there’s an easy solution: simply add a constant to all velocity values for “MIDI limiting.”
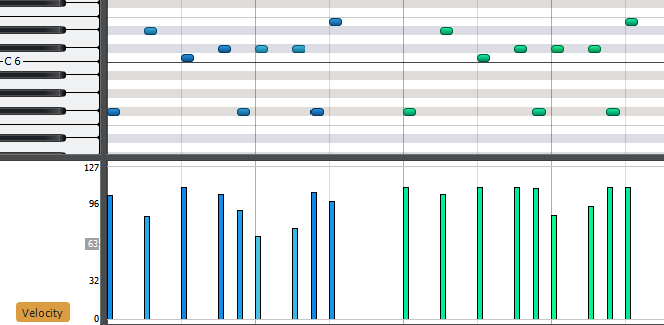
For example, suppose an instrument’s softest note velocity is 70, and the highest is 110—a difference of 40. Add 35 to all values, and now your softest velocity is 70+35=105, and your highest is 110+35—which can’t go any higher than 127 regardless, so now your highest-velocity note is 127 and there’s only a difference of 22 between the highest and lowest notes. If you want to go back to making sure the highest-level note is 110, then subtract 17 from all values. Your highest-level note is now at 110, but the lowest-level note is 88—still a difference of 22 instead of 40.
Referring to the image above, the blue notes show the original velocities. The green notes show what happens after applying the changes described in above, including subtracting 17 from the limited notes so that the highest-level green note is the same as the highest-level blue note.
Of course, limiting velocities doesn’t preclude adding audio compression, which may be needed as well (e.g., to reduce peaks with a resonant synthesizer filter). But you’ll probably find you need to add less of it, and therefore, the sound will be more natural.