
Sometimes loop recording isn’t an option to get the perfect take – but this technique is
To create the “ultimate take,” a common recording technique is to record multiple takes of a part, then identify the best bits from each take and splice them together (typically with cut and paste operations) to create a single, “perfect” part.
One way of doing this is called loop recording or cycle recording. Typically, the performer records several performances on different tracks while listening to a click or rhythmic reference, so that the different performances line up properly in terms of phrasing. Then you simply cut away the bad sections, leave the good sections, and optionally, bounce the remaining sections to a single track.
But what if you’re recording something like solo piano or guitar, a classical session, or anything that doesn’t work with a click? Traditional loop recording is usually not the answer. In this case, it’s often best to record multiple consecutive takes, cut away the sections you want to replace, and find better equivalent replacement sections in other takes. However, you have to pay careful attention to cutting at the right place, and crossfading properly—as shown in the step-by-step screen shots.
Tech Talk: A crossfade occurs when two sections of audio overlap: The first piece of audio fades out while the second one fades in, creating a seamless transition between the two. However, note that the crossfade curve is important—a linear fade out with a linear fade in will sound like there’s a slight volume dip at the transition point. Most crossfades use “equal power” curves, as shown in Step 4, where the two fades are exponential and complementary.
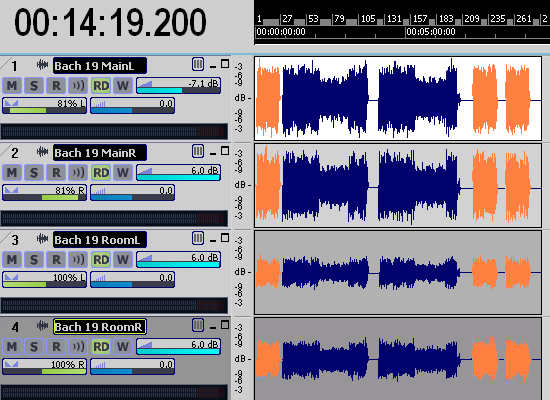
Step 1: Record multiple takes, making sure that all the takes are recorded under the same conditions: Same mics and mic placement, same tempo, and same dynamics—you don’t want to hear a noticeable difference when you combine sections from different takes. (Blue = two complete takes; orange = redos of the beginning.)
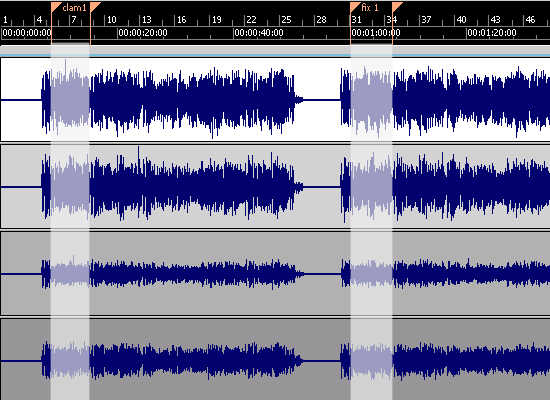
Step 2: Identify sections that need to be replaced, and suitable replacements. Inserting markers can help here, as most programs have “shortcuts” that let you navigate instantly to different markers. For example, the markers in the second take define a section that will replace the marked area in the first take.
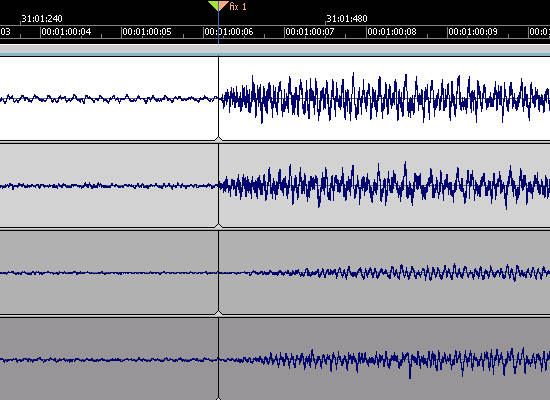
Step 3: Where you cut a section is crucial. Generally, the best splice points have strong initial transients; cutting at a transient will produce a less noticeable splice than, say, cutting in the middle of a sustained section. Zoom way in to see the exact beginning of the transient. Also note that the best splice point might be before or after the part you want to replace, or you may need to replace an entire phrase (not just the “bad” section) to create a better flow.
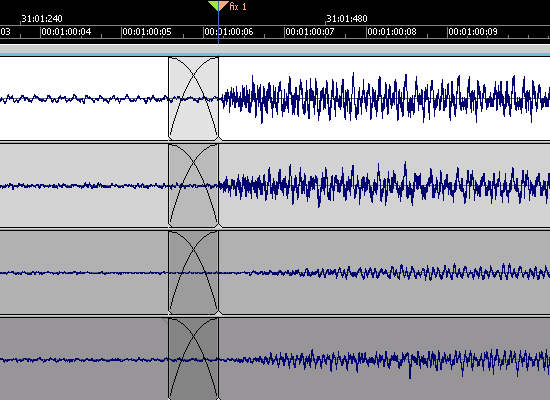
Step 4: When you paste, butt the transient from the replacement section up against where the transient was cut from the original section. Then, to avoid any clicks caused by level discontinuities between the two sections, create a smooth crossfade by extending the section before the transient so it overlaps with the section leading into the transient. Even a short crossfade (e.g., 10 ms) can be sufficient, but try longer fades—they might give an even smoother effect.