For more articulation, expressiveness, and innovative sounds, multiband processing is the ticket
Multiband processing splits a signal into multiple frequency bands—e.g., lows, lower mids, upper mids, and highs—and then processes each band individually. With hardware, this is difficult to implement. With software, it’s much easier.
This technique is especially effective with distortion to create a more defined, articulated sound. When you hit a low open string and then play a solo high on the neck, the two sound more distinct because they’re not both being forced into the same frequency band. Of course, that’s not always what you want—sometimes a sprawling, dirty sound is ideal. But a track processed with multiband distortion sounds more focused, and often, fits better into a mix.
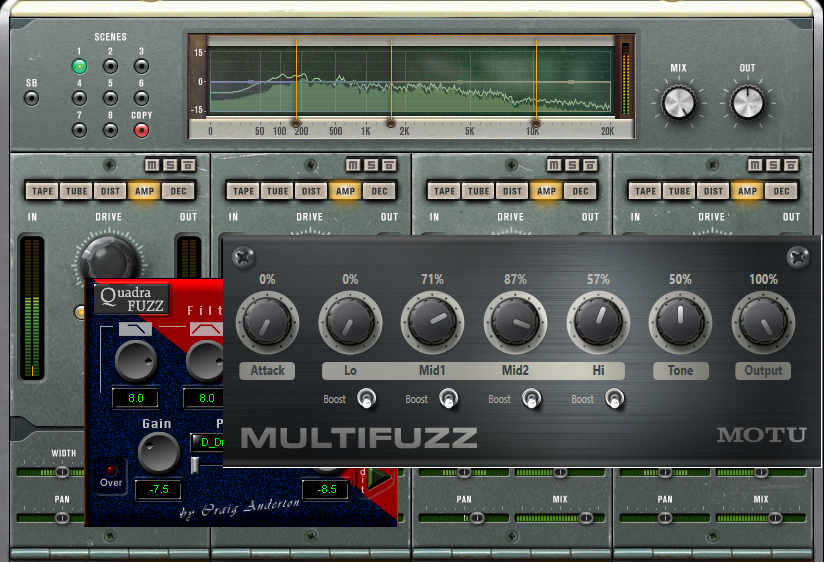
The first multiband distortion unit of which I’m aware was the Quadrafuzz, which I designed using analog circuitry. The original circuit was published in Guitar Player magazine in the mid-1980s. Since then, the original hardware has been virtualized in several different forms. In the featured image, from front to back, there’s MOTU’s Multifuzz (which is bundled with their Digital Performer DAW), the original Steinberg Quadrafuzz plug-in (no longer available), and the Quadrafuzz 2.0 that’s now bundled with Steinberg Cubase.
MULTIBAND PROCESSING APPLICATIONS
It can take some effort to set up multiband processing. When using software, save a template that includes the desired splits, so you can call it up any time you want multiband processing. Also save any presets you create.
Once the individual bands are set up, you may want to include the same processor in each but with different settings, and/or processors in some splits but not in others. Or you might want completely different processors in each split. The following multiband applications work well with guitar.
MULTIBAND DISTORTION
Multiband distortion sounds more focused because each amp and cabinet needs to distort only a limited frequency range. Even if you don’t like some amp models in your amp sim, try them with multiband distortion—you might change your mind when each amp can focus on specific frequencies. Following are some additional tips:
- Articulate notes better with heavy distortion. To have notes “ring out” above the distortion, on the highest band, cut back on the amp’s Drive. You may need to increase its level for the best balance.
- Open-back cabinet emulation. Use EQ on the lowest band to roll off frequencies below about 150 Hz. Open-back cabinets have less bass because the low-frequency signals that exit the back tend to cancel some of the low-frequency waves that come out the front.
- Experiment with the drive or other input level control. You’ll probably need to turn up the drive because there isn’t as much signal going into each amp. However, sometimes turning down the amp drive controls can produce beautiful clean tones, even with crunchy amp models.
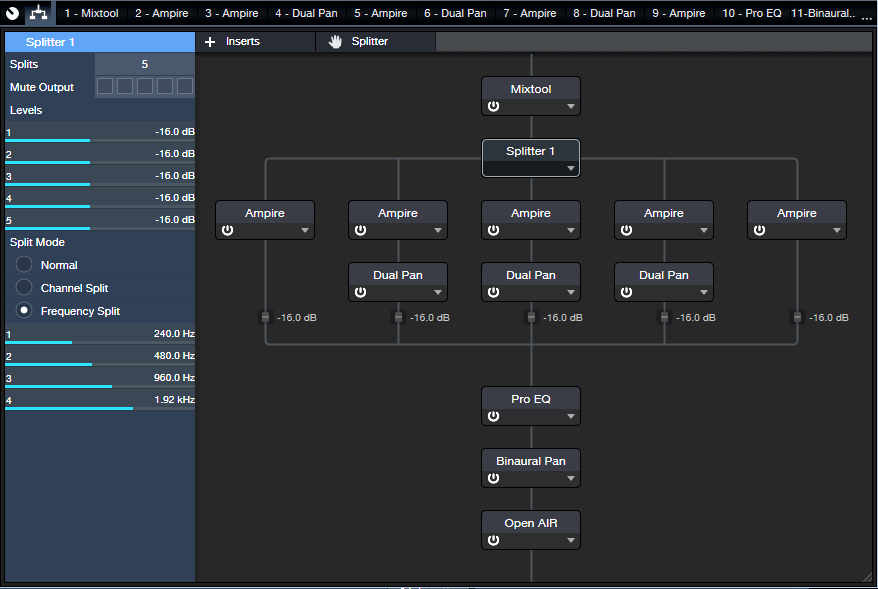
- Stereo imaging. In Fig. QQ below, note that the three middle bands have panpots. I keep the high and low bands centered, but pan two or three of the middle bands. Extreme pan settings can sound gimmicky, but mild panning can give a satisfying stereo spread.
- Extremely flexible sound-shaping. Try using different amps. Turn up drive in some but not in others, change the mix, pan individual bands, alter each band’s amp tone, and more. For example, the MCM 800 with the 4×12 MFB cab might sound good on the lower bands, with a Blackface Twin on the higher bands.
- Dirty + clean. Pan distorted signals left and right, but a clean signal in the center. It’s almost like having two different guitars.
MULTIBAND DELAY
Long, languid echoes on the high bands, with short delays on the lower bands to avoid muddying the sound, can be effective with leads. For example, try an eighth-note delay on the lowest two bands, quarter-note on the next-to-highest band, and quarter- or half-note on the highest band. Another option is to delay only the upper mids and highs to avoid potential low-frequency “mud.”
Sometimes short, slapback-type delays on the higher-frequency bands, and longer delays on the low-frequency bands, can create a delay effect that fits better in a track.
MULTIBAND MODULATION EFFECTS
Modulation effects can sound overly repetitive due to periodic LFO modulation. For lush, diffused chorusing, insert a chorus in each band with the LFOs set to somewhat different, slow speeds. The interaction among them produces a more varied sound.
With tremolos that offer sync to tempo, you can sync different bands to different rhythms, or try slower speeds on lower strings and higher speeds on higher strings.
MULTIBAND PROCESSING IMPLEMENTATIONS
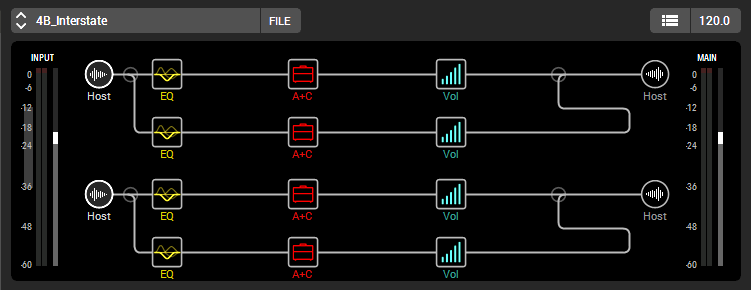
As shown in the featured image above, there are multiband distortion plug-ins. However, some amp sims have an inherent ability to create multiband presets. Line 6’s Helix Native has four parallel paths (Fig. 1). Assigning them to the same input, provides four bands of parallel processing.

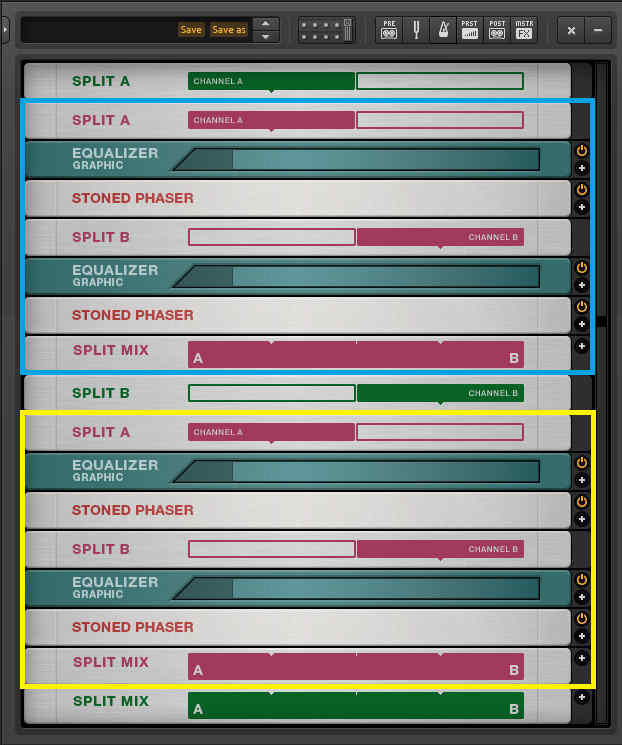
Guitar Rig’s Splitter module can be the basis of as many series/parallel paths as your computer or sanity can handle, because splits can split into additional splits. Fig. 2 shows an example of how to create four parallel paths.

The screen shot shows two main splits. Split A (at the top) goes into two additional splits (outlined in blue). Each split has an equalizer to filter out a specific frequency band, and a phaser effect. Split B (toward the middle) goes to two more splits, which are outlined in yellow. These also have an equalizer and phaser in each split. This results in four parallel phaser paths. Each phaser processes a specific frequency range.
Guitar Rig also has a Crossover component (in the Tools section) for two-band setups. A crossover divides the incoming signal into high and low bands, each with its own output. For example, suppose you want the higher strings to ring out clearly, while the lower strings have a big, fat sound. Set the crossover to around 300 Hz, then send the low frequencies to the Lead 800 amp for a beefy tone, and the high frequencies to the Plex amp, which has a cleaner sound.
Fig. 3 shows a Splitter application using Studio One’s FX Chain Splitter module that splits the audio spectrum into as many as five bands.

The Splitter is using its Frequency Split superpowers to create five bands. Each band feeds an Ampire amp simulator. The Mixtool at the beginning gives about 10 dB of gain—because we’re filtering out so much sound going into each Ampire, the extra gain helps hit the amps a little harder. You may also want to increase an amp’s Drive control. The Pro EQ at the end:
- Rolls off the lows, which tightens up the sound (reducing lows can also emulate the sound of going through an open-back cabinet).
- Attenuates the extreme highs to sweeten the sound.
- Adds an upper midrange lift.
The Binaural Pan widens the sound, while the Open Air reverb creates ambiance.
SETTING THE SPLITTER’S FREQUENCY BANDS IN STUDIO ONE
The Splitter’s per-split Mute buttons make it easy to set the split frequencies, because you can optimize individual bands without being distracted by the sounds of other bands.
Start with all bands muted except the lowest band, and focus on the guitar’s low bass. Mute that band, and unmute the next higher band. Zero in on the guitar’s upper bass. Proceed similarly until each split covers approximately the same range.
OTHER MULTIBAND PROCESSING APPLICATIONS
The most common multiband processing applications are with multiband compression, typically used with program material like stereo mixes, and special effects for guitar. But multiband processing is also effect with bass, keyboards, drums, and much more. Give it a try, and you’ll find a whole lot of creative possibilities.
