Sampled drums don’t have to sound boring
I’ve been spoiled by using acoustic drum loops (by Chris McHugh) for my mostly rockish music. Even drummers think I’m using a “real” drummer…which I am, actually.
But for a recent EDM-oriented project, I needed electronic drums. I’d forgotten just how boring they can sound. What to do? Well, Here are a few tricks that made a huge difference.
THE SNARE
The snare is the giveaway that you’re in robo-land because it’s going to get hit a lot. Render the snare audio to its own track, then try the following
- Vibrato plug-in. This is a fast, simple solution that adds just enough difference not to have every hit sound the same. Finding a true vibrato effect is not that easy; most of the time you’ll need a chorus or flanger that can be set to one voice, with a mix for only delayed sound.
- Volume shifts. This takes longer to edit, but remember that each hit on a snare will play at a slightly different level and at a different place on the drum. Alternating slight volume variations helps considerably in creating realism, even with individual hits—not just rolls.
- Minor pitch shifts on different hits. We’re not talking transposition in semitones, but shifts that are more on the order of 20-40 cents.
- Very short attack times. In addition to lowering the overall level, adding only a few milliseconds creates an effect that’s somewhat like ghost notes.
- Layer a sidestick sample with the snare for emphasis. This increases the level, and helps give the snare a more percussive feel.
It seems it’s not so important that these changes duplicate what happens with a real snare, but rather, that they just keep the electronic ones from sounding all the same. That seems to satisfy the ear-brain combination.
CYMBALS
Back when memory was expensive, cymbal samples…well…let’s just say they weren’t very good. So I got into the habit of playing real cymbals over electronic drum parts, even though they weren’t “purist” EDM sounds they sounded pretty good. Even if you’re not a drummer, you can probably hit cymbals at the right time.
QUANTIZATION
Pro drummers are able to control their timing extremely accurately, and can lag and lead the beat in strategic ways. While those who play drums from keyboards or controller pads often have the right intention for timing, they just don’t pull it off with the required accuracy. Try 85% quantization, which should tighten up your drum parts without strangling them. (However, I do make sure the kick is right on the beat—see if that works better for you as well.) I also like adding swing, because it’s amazing how even a tiny bit of swing – just a few per cent – can make all the difference in the world when you want a drum part that grooves just a little bit better.
HI-HATS
Hi-hats are a good candidate for step sequencing, because newer step sequencers (e.g., the one in Cakewalk by BandLab, or the Pattern option in Presonus Studio One) allow for creating a less rigid, more human sound. Let’s show how to do this with a 16th-note hi-hat part. Although the descriptions involve Cakewalk’s step sequencer, the same principle apply to other step sequencers, as well as entering notes in a MIDI piano roll view.
If you enter a string of successive 16th notes and simply play them back, I take pity on anyone listening. My model for a 16th-note humanized hi-hat part is what Tony Williams did on Miles Davis’s “In a Silent Way.” No, it’s not EDM…but if you do EDM, you need to know about this hi-hat part. So check out the following video (if you’re the impatient type, start at 01:30).
Adjust dynamics
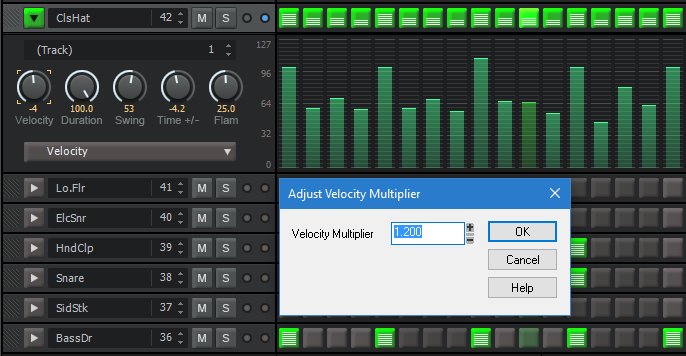
In the featured image for this article of Cakewalk by BandLab’s step sequencer, note that the first 16th note of each beat is accented the most, with the third note of each beat accented less, but more so than the second and fourth notes. Also note that this isn’t a rigid change—there are some variations, but the most consistent element is that first beat. This is a good place to start.
Now let’s mess with the dynamics some more. Right-click on a row to bring up the Velocity Multiplier. This compresses velocity with values under 1 and expands velocity with values over 1. Here I’ve expanded the velocity by 20%, and because that raises the overall level, trimmed back the Velocity control just a bit by -4.
It don’t mean a thing if it ain’t got that swing
Some people think the purpose of swing is to create extreme shuffle beats. That’s certainly one application, but with something like a 16th hi-hat pattern, even a small amount of swing—in this case, a value of 53—adds a variation that makes the part swing and come alive. A little swing goes a long way in this context, but it’s all you need.
Push the beat
Now let’s “push” the beat a bit, which is ideal for EDM because it adds a sense of urgency yet doesn’t interfere with that rock-solid “four on the floor” kick. Here, an offset value of -4.2 ahead of the beat does the job. However, if you really want to get into it, you can get more detailed than a global amount of offset: Select Time Offset from the drop-down menu, and you can add individual offsets for each note if you want.
To prove to yourself what kind of difference this makes, lay in a closed hi-hat part with straight 16th notes and then make the kind of tweaks shown in the screen shot. The difference is not just night and day—it’s a winter night and summer day in Alaska.
But wait—there’s more! Yes, there always is…isn’t there?
Hopefully you can modulate the hi-hat’s decay time a bit to make it more or less closed, and therefore add even more dynamics. Or, start off with a lowpass filter all the way up at the beginning of the beat, then close it down ever so slightly over the course of the beat. And then you can convert the Step Sequence to a MIDI piano roll view-editable clip while retaining the humanized elements you’ve programmed in. Happy hi-hat!