When mixing, the usual way to make a track stand out is to raise its level. But there are other ways to place a track in a mix…
When mixing, the usual way to make an instrument stand out is to raise its level. But there are other ways to make an instrument leap out at you, or settle demurely into the background, that don’t involve level in the usual sense. These options give you additional control over a mix that can be very helpful.
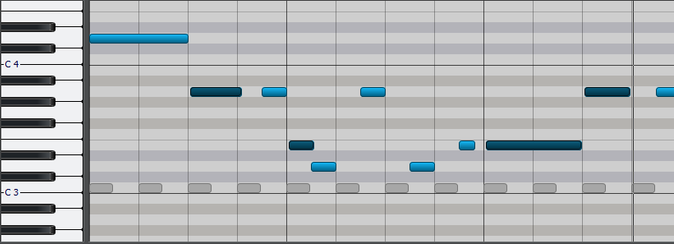
CHANGING START TIMES CHANGES PERCEIVED LOUDNESS
The ear is most interested in the first few hundred milliseconds of a sound, then moves on to the next sound. This may have roots that go way back into our history, when it was important to know if a new sound was leaves rustling in the wind—or a saber-tooth tiger looking for fast food.
What happens during those first few hundred milliseconds affects the perception of how “loud” that signal is. Given two sounds that play at almost the same time, the one that started first will appear to be more prominent. For example, suppose kick drum and bass hit at the same time. Move the bass a tiny bit ahead of the kick for a more melodic feel, and behind the kick to emphasize the rhythm.
In the above screen shot, the gray notes are a kick that lands right on the beat. The dark blue bass notes hit at the same time as the drums, and are behind the beat just a little bit to make sure the kick gets the spotlight – this way the music feels more rhythmic than melodic. With MIDI sequencers, a track shift function will take care of moving the start time for selected notes. With hard disk recorders, you can simply grab a part on-screen and shift it, or use a “nudge” function (if available). Even a few milliseconds of shift can make a big difference.
CREATIVE DISTORTION
If you want to bring just a couple instruments out from a mix, patch a distortion plug-in set for very little distortion into an aux bus during mixdown. Now you can turn up the aux send for individual channels to make them jump out from a mix.
PITCH CHANGES IN SYNTH ENVELOPES
This involves a little synth programming, but the effect can be worth it. As one example, take a choir patch with two layers (the dual layering is essential). If you want this sound to draw more attention to itself, use a pitch envelope to add a slight downward pitch bend to concert pitch on one layer, and a slight upward pitch bend to concert pitch on the other layer. The pitch difference doesn’t have to be very much to create a more animated sound—remove the pitch change, and notice how the choir sits further back in the track.
MIXING VIA EQ
EQ is a very underutilized resource for mixing. Turning the treble down instead of the volume can bring a track more into the background without having it get “smaller,” just less “present.” A lot of engineers go for really bright sounds for instruments like acoustic guitars, then turn down the volume when the vocals come in (or some other solo happens). Try turning the brightness down a tad instead. And of course, being able to automate EQ changes makes the process go a lot more easily.
Overall, when it comes to mixing you have a lot of options other than just changing levels, and implementing changes in this way can make a big difference to a mix’s “character.” Try adding some of the above tricks—or similar ones of your own making—to your mix, and you’ll add yet another dimension to your sound.