
Presets are fast and easy, but they’re not always the right tool for the right sound
Admit it: You just dial up presets. If you like them, great. If not, you keep dialing.
There’s nothing wrong with that; you want to make music, not become a synth programmer. But you don’t have to create presets from scratch—you can instead modify presets that are close to what you want so they become exactly what you want.
So let’s check out some simple tweaks. We’ll assume a fairly standard synth architecture, but hopefully you’ll be able to translate these concepts to your particular instrument.
1. Brighter or Darker Overall Sound
Assuming a lowpass filter is in play, turn up the filter envelope amount. This leaves the attack and decay characteristics in place, but kicks the overall filter response higher. Similarly, you can darken the sound by turning down the envelope filter amount. An alternative is to vary the filter envelope sustain level—increase for brighter, decrease for darker. This will likely interact with the attack and decay characteristics, which may add a useful variation to the sound in addition to changing the tone.
2. Cool Patch…Too Bad It’s Not a Bass
But it might make a good bass if you transpose one or more oscillators down an octave. This also builds on the previous tip, as you might want to reduce the highs somewhat so the bass sits better in the low frequencies.
3. Why be Normal?
Some tweaks can create entirely new presets if you apply a sound “incorrectly.” Take a bass patch, and transpose the oscillators up an octave or two (you might want to refer to the filtering tip to increase the brightness a bit). I’ve stumbled on some killer electric piano sounds by transposing electric bass sounds up an octave or two.
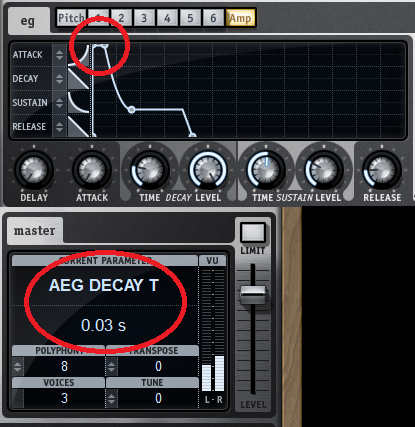
4. How to Add “Punch”
This requires setting the attack time to minimum, and an amplitude envelope with a hold control (or a rate/level type of envelope that lets you create a hold time). Set the hold time to about 25-30 ms for a tasty “spike” that adds punch (Fig. 1). Interestingly, the original Minimoogs had a brief, inherent envelope hold time—I’ve often thought this was one reason why Minimoogs were considered punchy (and after I pointed this out in an article, Kurzweil added a punch parameter on some synths).
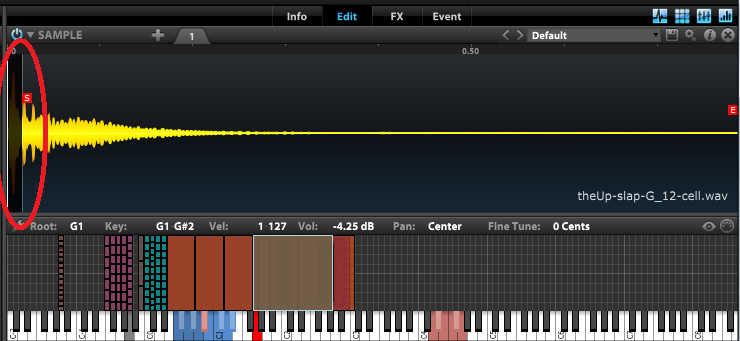
5. How to Subtract “Punch”
Many sample-based instruments can edit the sample start time. Because an instrument’s attack usually determines the punch, moving the start time later will take out the pluck of a string, the zing of a bowed sound (Figure 2), and the like. But this can also add more punch with instruments having an attack time, like wind instruments.
6. Sound Is Too “Sharp” and “Thin”
Turn down the filter resonance control, which will also help the sound sit more in the background. Conversely, adding a little resonance often brings a sound more to the forefront.
7. Obtain a More Focused Sound
Quite a few presets detune oscillators somewhat to add a chorusing-like effect. This can make a cool, gossamer background sound, but it creates a lot of amplitude peaks and cancellations as the oscillators interact with each other. Adding a limiter after the synthesizer will retain the chorusing, while creating more even volume levels.
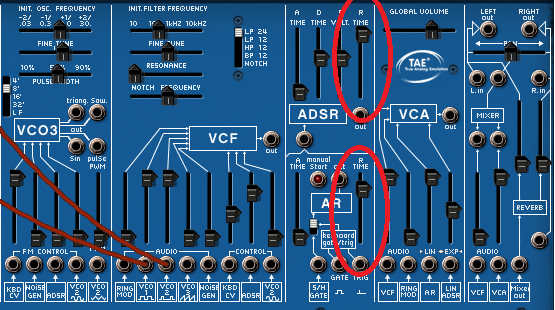
8. A New-Agey Kind of Reverb
Turn up the amplitude envelope release control to add an evocative, reverb-like lengthening to notes when you release your fingers from the keys. This can work really well for pads. Note: you may also need to turn up the filter envelope release control (Figure 3); otherwise the filter cutoff may go low enough to make the note inaudible before the volume envelope fades out completely.
9. Calling All Electro Fans
Make any preset sound percussive by turning down the amplitude envelope sustain control, setting attack and release time to minimum, and using the decay control to create a percussive decay. If you keep your finger on the key, the decay will cycle all the way through but if you just strike the key briefly, the decay will last only as long as your finger is on the key. For a consistent decay time regardless of how you hit the key, adjust the release control for the same amount of decay as the decay control.
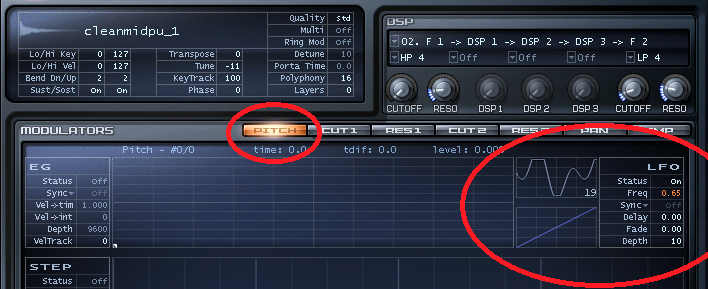
10. Travel Back in Time
This requires a bit more effort, and but you can re-create the somewhat random charm of older analog synthesizers. Route an LFO to one (or as many as you want) of the oscillators in a preset, set the LFO for a very slow rate, and add a very slight amount of modulation to change the pitch in an almost subliminal way (Figure 4). A smoothed random LFO waveform is best for this, but if there’s no random option, a triangle wave will work in a pinch if it’s slow enough—or use two LFOs set for different rates, and apply a very little bit of signal from each one.
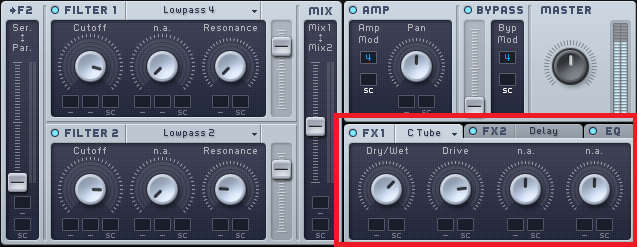
11. Don’t Forget the Processors – Especially Distortion
Onboard effects can twist a sound around with very little effort. I was once asked which synth I used to get “that amazing funky Wurlitzer sound”—it was a True Pianos acoustic piano, followed by EQ to take off the highs, then topped off with distortion. Distortion on organs and NI’s Massive (Figure 5) or Massive X can also be a beautiful thing.
12. And Don’t Forget the Modulation
Real-time modulation controls, like footpedals and aftertouch, are a great way not just to alter a preset but do so in real time. Many presets don’t include these assignments because it’s not assumed you have a suitable controller, but once you crack the code on matrix modulation, it’s easy to add real-time modulation and personalize a preset.