How useful are multiple outputs? How do you use them? What about effects? Find out here.
The term multiple outputs, when applied to musical instruments, means being able to separate different sounds within the instrument, then send them to different audio outputs (either physical or virtual). This type of instrument is called multitimbral, and each sound typically responds to incoming data on a different MIDI channel. However, note that setting two instruments to respond to the same MIDI channel can provide layering effects.
One of the first uses for multiple outs was drum machines. They had a stereo out for an overall mix — but generally, you didn’t want the same processing on, say, kick and tambourine. If a drum machine had four outs, you’d often assign kick to one, snare to another, and the rest of the kit to a stereo mix.
As hardware synths became multitimbral, multiple outs became more important because different instruments often demand different processing. Deep reverb on strings? Sure. On bass? Uh…no. So, you’d assign different instruments to different outs, which went into different mixer channels. Each sound could have its own EQ, dynamics processing, special effects, etc. Clearly, this beat the “one size fits all” approach.
THE VIRTUAL LIFE
In today’s virtual world, here’s how multiple outs work. Inserting an instrument with multiple outs into a host program like Logic, Cubase, Studio One, Digital Performer, etc., creates a separate audio track for each out in the host’s virtual mixer. These audio tracks work like any audio track — you can insert effects, mix, pan, automate, etc. No waveforms show up in the tracks, unless you render the instrument into audio.
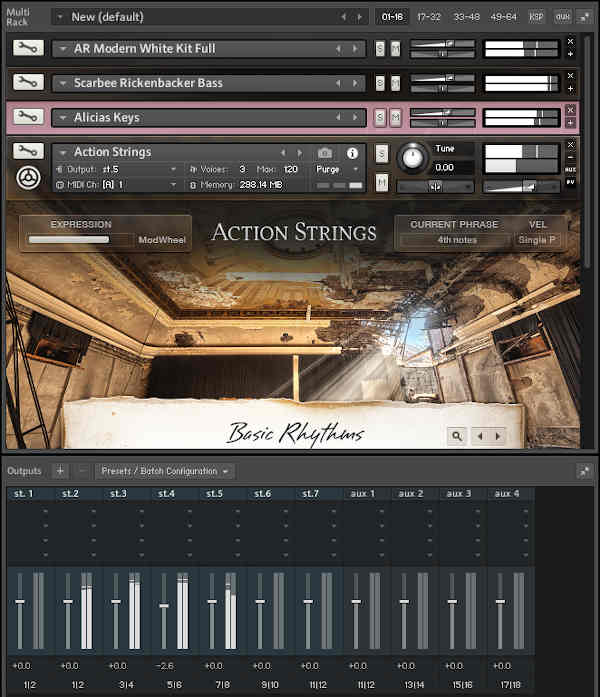
In the featured image, there are four instruments loaded into Native Instruments’ Kontakt – Modern Drums, Rickenbacker Bass, Alicia Keys, and Action Strings. Each responds to its own MIDI channel, and feeds its own audio output channel.
With a multitimbral synth or sampler, each instrument would ideally have its own stereo output. But with a 16-channel multitimbral instrument, that means 32 outs.
One workaround is to insert more than one instance of the instrument. For example, if there’s a maximum of four stereo outs, insert another instrument for eight stereo outs. However, depending on the instrument architecture and computer, loading multiple instruments into one instance may or may not save CPU power. For more information, see the article Multi-Timbral Instrument vs. Multiple Instances—Which is Better?
If your CPU starts getting really unhappy, you can always use a program’s freeze function, which has two advantages:
- It converts the virtual instrument track into a more CPU-friendly hard disk audio track
- It “disconnects” the instrument from the CPU to save power
Most programs let you “thaw” the frozen tracks so it can be edited further, but if not, as long as you retain the MIDI track that drives the instrument and the synthesizer’s preset, you can re-create the track and re-freeze it after making your edits.
HANDLING EFFECTS AND IMAGING
One big advantage of multiple outs — being able to add effects within the host — has been mitigated somewhat by instruments that include built-in effects. However, these effects are often optimized to keep CPU power consumption under control. For effects that want lots of CPU power and are intended to process several instrument sounds (like a good hall reverb), disable the instrument’s effects, and insert the reverb into a host aux bus. Then, use each track’s send control to apply some signal to the aux bus. In this case, the reverb is set for processed (wet) sound only, then brought back into the mix. Combining this processed reverb sound with the dry instrument sound will provide the desired amount of ambiance.
OTHER MULTIPLE OTPUT APPLICATIONS
Separate outs also have other creative uses. For simulated stereo imaging, load the same instrument twice. Restrict one instrument to a lower keyboard range (e.g., below middle C) and pan its output toward the left, then restrict the other to the upper keyboard range and pan its output more to the right. Lower notes will come out the left, and higher notes from the right.
Or load the same instrument into two program slots, but don’t restrict the key ranges; instead, tune one a few cents sharp, and the other a few cents flat. This can produce a huge stereo image, but check mono playback— you may need to edit the detuning to avoid “beating” or signal cancellation.
And don’t forget you can process outputs individually…feel free to get creative!