
Rack-mount compressors can give higher performance than stompboxes, if you know how to use them
In the studio, dynamics control for vocals or program material is very different compared to guitar. Much of this is because there are many ways to use dynamics processing, especially compression, for guitar (or bass). So, let’s take a look at the different ways to apply dynamics, with examples of suggested settings. We’ll start with a few basics on how to set up studio processors with guitar.
INTERFACING GUITAR WITH RACK-MOUNT COMPRESSORS IN THE STUDIO
For onstage use, “stomp box” dynamics processors make a lot of sense—they’re small, inexpensive, and reliable. But in the studio, rack-mount hardware can be more versatile, and offer better specs. However, they’re usually not designed to handle the low output level, and high output impedance, of typical guitar pickups. Interfacing studio processors with guitar involves one of four approaches.
Use an instrument input. If the processor has an “instrument” input, you’re ready to go. Plug the guitar directly into the processor, then run it into the mixer, amp modeler, or whatever. The instrument input impedance should be above 100k ohms, and preferably above 220k ohms, to avoid dulling high frequencies and reducing level. However, an impedance in the 5-10 Megohm range reaches a point of diminishing returns, because the input may be overly sensitive and prone to noise pickup. A 1 Megohm impedance is a good compromise value.
Use a preamp, or suitable direct box. Adding a preamp or direct box (assuming it has an appropriately high input impedance) before the processor will preserve the guitar signal’s fidelity and match levels properly. If you’re driving a guitar amp with a studio effect, you may be able to use the dynamics processor’s output control to add some extra overdrive.
Insert into your guitar amp’s effects loop. If you want to record with your guitar amp but are using a line-level processor, patch it into the guitar amp’s effects loop. The loop may be able to provide line levels for the send (goes into the processor’s input) and return (comes from the processor’s output).
Insert the dynamics processor into a mixer’s channel inserts. This will also match levels properly, although you still need to interface the guitar with the mixer input with a preamp, direct box, etc., as described above.
COMPRESSOR TECHNOLOGIES
Dynamics processors inspire endless debates over their technology: tube or solid state, optical or VCA, peak or RMS detection, manual or automatic attack/decay settings. Of course, the answer to any debate is in the ear of the beholder. Nonetheless, someimes these characteristics matter, so let’s consider the three most common ways to use dynamics processing with guitar. We’ll reference control settings to gain reduction reading on the gain reduction meter—a crucial visual feedback element in any dynamics processor. We’ll also assume that the input signal feeding your processor uses the full input range (i.e., the peak levels are just short of distortion).
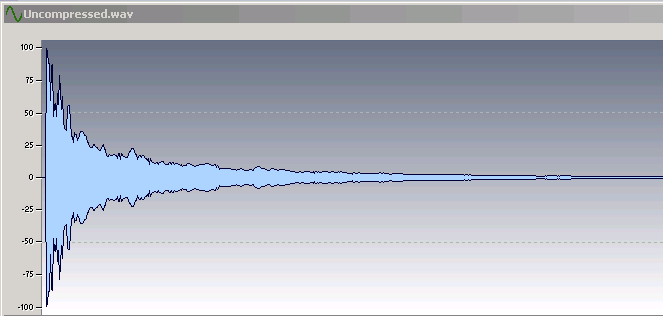
For reference, Fig. 1 shows an uncompressed guitar chord. Note how it’s changed in subsequent images that are based on compression being added.
USE COMPRESSION FOR MORE SUSTAIN
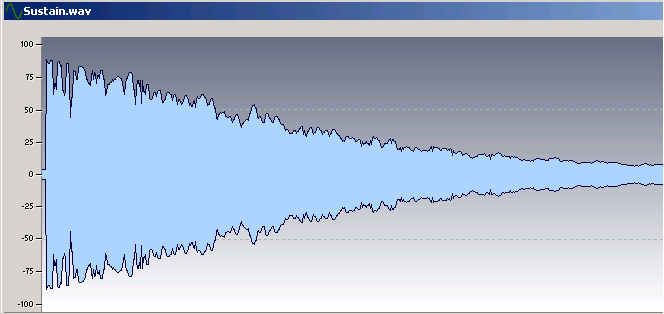
The object of sustain (Fig. 2) is to bring up low levels as the string decays. Here are some suggested settings.
Gain reduction meter: The meter should show a large amount of gain reduction (e.g., 10-16dB), and the gain should remain fairly reduced as the string decays.
Threshold: Set this to a low value, like -20dB. That will allow compression to remain in effect, even at low signal levels.
Ratio: Start with 10:1, and move up from there. This is an instance where large ratios are a good idea.
Attack: Set a short attack time so that if the note is toward the end of its decay and you hit another note, there won’t be a big pop or peak at the new note attack. With analog compressors, you’ll never get a true 0 attack time – you need digital look-ahead for that. Fortunately, the transient may be so short that you can clip the transient, yet not notice any significant distortion.
Release: This should be fairly long, like 200ms or so. Watch the gain reduction meter – play a note, than mute it sharply. The gain reduction meter should drift back to 0 gain reduction over about a second, not “snap” back quickly to 0.
Opto vs. VCA: VCA will minimize attack time. However, if there’s an opto option, you may like the way it colors the sound.
CREATE A BIGGER SOUND WITH COMPRESSION
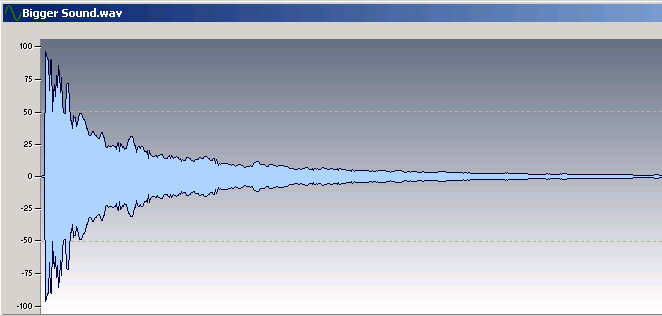
In this case you don’t want to “hear” the compressor doing its thing, but just give the guitar a level boost while sounding as uncolored as possible. Fig. 3 has the same basic dynamics as the uncompressed signal, but with a little less attack amplitude and a slightly “lifted” decay.
Gain reduction meter: For the most authentic sound, don’t reduce gain more than -3 to -6dB. The gain reduction meter motion should also be fairly “tight,” without a lot of drifting.
Threshold: Set to a value around -6dB, which should be enough to have an effect without sounding “compressed.”
Ratio: Lower ratios will sound more transparent. Even ratios below 2:1 (e.g., 1.5:1) can be useful. In any event, it’s doubtful you’ll want to go much above 4:1.
Attack: As you’re not imposing huge amounts of compression, adding a little attack time (around 10-40ms) will allow a more percussive, thus more natural-sounding, attack. If you hear “popping” instead, either reduce the attack time, raise the threshold, reduce the ratio, or try a combination of all three.
Release: Try 50ms or less. You want a smooth, but rapid, drift back to no gain reduction after you stop playing.
Opto vs. VCA: Try using an Opto setting, as this can give a useful”character” to the sound.
HOW TO CONTROL TRANSIENTS WITH COMPRESSION
The classic example is slap bass, where there’s a huge initial transient followed by a much lower level. If you set levels to accommodate the transient, the sustain will be too low; set levels for the sustain, and the transient will likely produce a nasty pop. Here’s what to do for maximum transient control; pull back from these settings if the effect is too drastic.
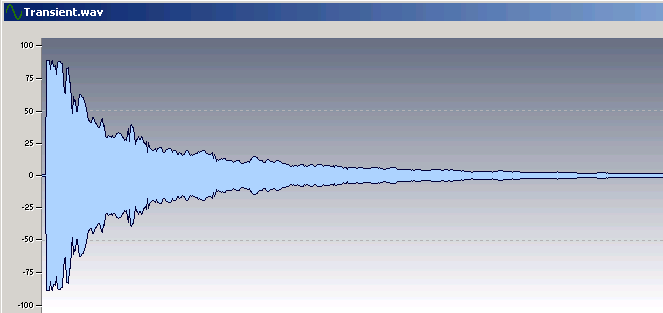
In Fig. 4, the transients are controlled. Note the greatly reduced attack, which allows bringing up the entire waveform’s level without clipping. But also note that the decay’s shape is essentially the same as the uncompressed signal.
Gain reduction meter: This should snap to the maximum amount of gain reduction, then snap back to 0 fairly rapidly after the transient is over.
Threshold: Set this to a high value, like -3 to -6dB. You want to affect just the initial transient.
Ratio: Use a high ratio – over 10:1 – if the transient is strong and needs taming. Higher ratios will push the gain reduction meter further into the reduced gain zone.
Attack: If possible, set this to zero as you want to clamp the transient as rapidly as possible.
Release: This should be fairly short (20-50ms). The gain reduction meter should return rapidly to 0 gain reduction after the transient is over.
Opto vs. VCA: Definitely VCA, you want the fastest possible attack.
USE EXPANSION TO CONTROL NOISE
Some dynamics processors also include dynamic expansion (basically the inverse of a compressor, where gain drops off rapidly below a certain level) or noise gating. In general, I prefer dynamic expansion for its smooth decay characteristics. However, some gates include attack and decay controls, making it easier to simulate the effect of using an expander.
With most compressors, the easiest way to adjust the amount of reduction is to hit a string or chord, then wait until the level reaches the lowest desired level. Quickly turn the noise reduction threshold control until you can see that expansion is active, and you should be pretty close to the right setting.
USE TWO COMPRESSORS IN SERIES FOR GENTLER COMPRESSION EFFECTS
Patching two compressors in series, with both set for small amounts of compression, can give a significant amount of compression but sound less obvious than using a single compressor to give the same amount of compression. The first stage essentially “pre-conditions” the signal so that the second compressor doesn’t have to work so hard.
If you have a stereo compressor that can be set to dual mono operation, you can patch the two individual compression channels in series. The drawback is that unlike standard compression, where you have to adjust only one set of controls, this approach requires adjusting both sets of compressor controls. While that might seem like a disadvantage, most of the time you’ll set them to similar settings anyway.
CHOOSING A RACK COMPRESSOR
The choices are huge, ranging from under a hundred dollars to thousands (and thousands!) of dollars. But realistically, for the type of application we’re describing here, you don’t need anything too fancy—it’s not like you’re using the compressor to re-master vintage recordings for audiophile releases. Besides, these days technology is at a level where even fairly inexpensive devices can deliver excellent results.
In any event, all the above tips are just guidelines. Experiment with your dynamics processor, and you may find yet another way to exploit these perhaps unglamorous, but extremely useful, devices.
Featured image by Anton Ponomarev