Don’t believe everything you hear…Cakewalk can get along with Komplete Kontrol keyboards
Although Cakewalk doesn’t officially integrate with Native Instruments’ Komplete Kontrol keyboards, we can integrate some aspects by using Cakewalk’s Active Controller Technology (ACT) feature. And, even though Komplete keyboards’ documentation says it works as a general-purpose MIDI control surface only when operating in stand-alone mode with the 5-pin DIN connections, we have a workaround for that, too.
The following is based on a Komplete S-series Mk 2 keyboard; without other gear, I can’t vouch for the A-series keyboards, or older models.
Native Kontrol System Basics
Native Instruments’ Native Kontrol System (NKS) is based around the Komplete Kontrol VST2 plug-in—a Cakewalk-compatible “wrapper” for plug-ins that conform to the NKS protocol, whether from NI or other companies (Waves, A|A|S, Arturia, etc.). The companion NKS-compatible Komplete keyboards have a control surface (with two displays, eight faders, eight buttons) that can browse, insert, and edit both virtual instruments and effects in a virtual instrument track (unfortunately, you can’t yet control effects in standard audio tracks). It also provides various DAW control and navigation functions.
Getting Started with Komplete Keyboards
To use the Komplete keyboards as general-purpose MIDI controllers, first install the MIDI-OX utility from midiox.com. This utility routes MIDI inside of the Windows OS, so it can divert Komplete keyboard MIDI messages from the 5-pin DIN port to the USB port that Cakewalk monitors. After installing MIDI-OX, here’s how to integrate some Komplete keyboard DAW functionality.
1. Turn on the Komplete keyboard.
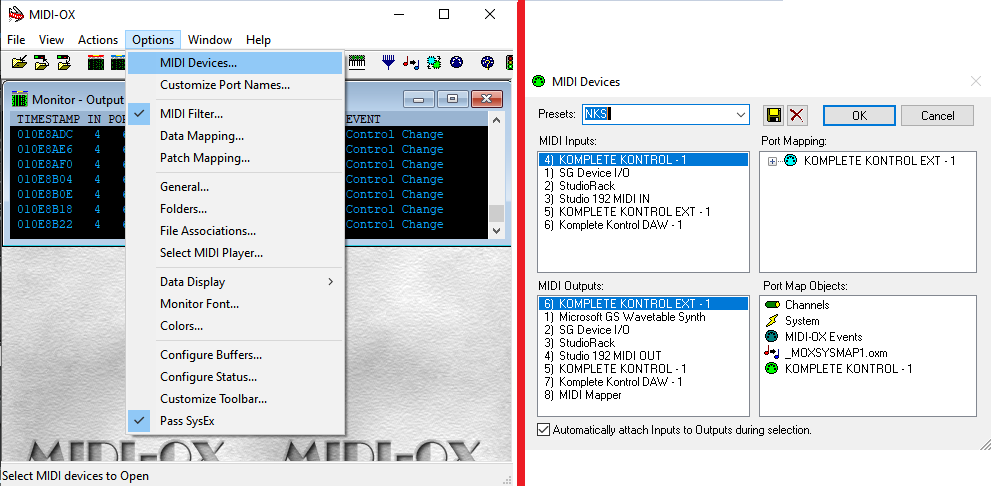
2. Open MIDI-OX before opening Cakewalk. Under MIDI-OX’s Options > MIDI Devices, choose Komplete Kontrol – 1 for MIDI Input and Komplete Kontrol EXT-1 for MIDI output. Click OK to close the MIDI Devices screen, but leave MIDI-OX open while Cakewalk is open. The featured image shows how to set up the MIDI-OX utility so that NI keyboards can control non-NKS instruments.
3. Open Cakewalk. Before opening an actual project, choose Edit > Preferences > MIDI Devices. Tick all Komplete-related MIDI devices for both MIDI In and MIDI Out: Komplete Kontrol, Komplete Kontrol Ext, and Komplete Kontrol DAW. Click Apply, and Close.
4. Choose Edit > Preferences > MIDI > Control Surfaces, and click the New Control Surface button (the one that looks like a star). Choose ACT MIDI Controller for the control surface, Komplete Kontrol DAW for the Input port, and —None— for the Output Port. Click OK, Apply, and Close.
5. Exit Cakewalk, then open it again (this usually isn’t necessary, but makes sure Cakewalk starts off with its control surface and MIDI ports ready to go).
6. Open a Cakewalk project.
7. Insert the Komplete Kontrol VST2 instrument plug-in as a Cakewalk Instrument.
8. Load an NKS instrument, like Massive, to make sure NKS is working correctly. The Komplete keyboard’s PLUG-IN button (in the upper right cluster of six buttons) should be lit brightly. If the MIXER button is not lit at all, press Cakewalk’s Play button, then Cakewalk’s Stop button. The MIXER button will light dimly.
9. Press the MIXER button. It now lights brightly.
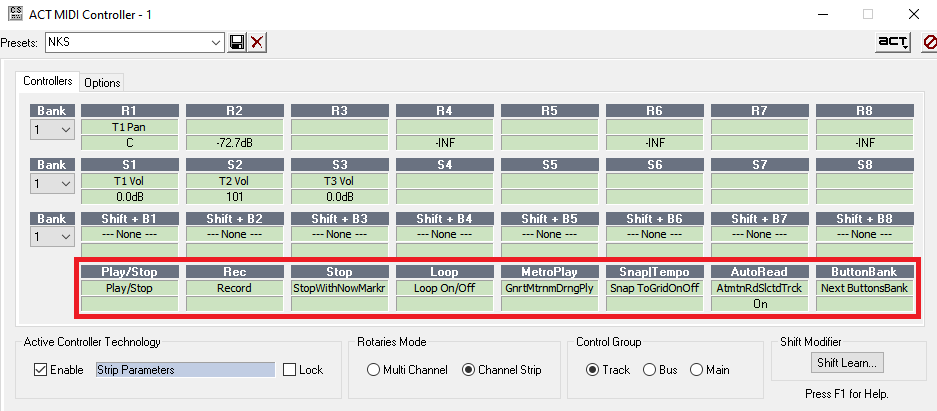
10. Choose Cakewalk’s Utilities > ACT MIDI Controller to open the ACT interface. We need to create an ACT template; I modified an existing one. We’ll use only the bottom row of buttons in the ACT interface, which simplifies matters.
DAW Control Functionality
Yes, ACT can be daunting and inscrutable. I’ve spent literally days figuring out how to make the procedures described here repeatable, but I think I’ve succeeded…just follow all the steps carefully, and everything should work.
ACT responds to the following Komplete keyboard buttons, whether they’re lit or not: Undo, Quantize, Auto, Loop, Metro, Tempo, Play, Record, Stop, Clear, Left/Right Arrow (although they both control the same function you assign to either one), and four navigation knob options: rotate, push left/right (either controls the same parameter), push up/down (again, both control the same parameter), and push down on the knob’s top. These control most Cakewalk switched functions via ACT. The following Komplete keyboard buttons don’t seem to work with ACT: Shift, Scale, Arp, Mute, Solo, Scene, Pattern, Track, Key Mode, and Up/Down Preset.
Let’s assign the keyboard’s Play button to Play/Stop, Record to Record, and the Stop button to Stop with Now marker.
1. Verify that the Komplete keyboard’s MIXER button is glowing brightly. Press it if not.
2. Name an ACT interface button’s label (the lettering on the gray background) by clicking on it, then typing the name of the function you want to assign to it. Do this for all of the lowest row of eight buttons. Having names simplifies programming their intended functions later.
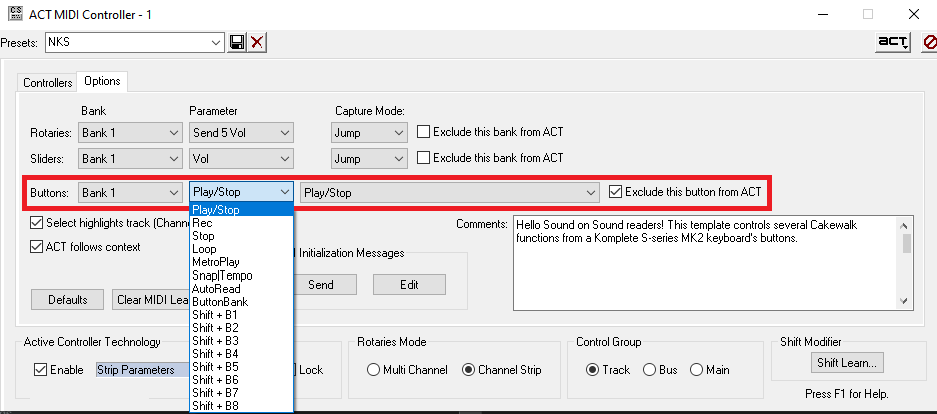
3. Assign functions to the buttons by clicking on the MIDI ACT Controller UI’s Options tab, and choosing a function for each button. For example, to program Play/Stop as the first button, for the Buttons field, choose Bank 1. The Parameter field drop-down menu shows the labels you selected for Bank 1. Choose Play/Stop. The field to the right of this parameter is a drop-down menu with the available functions you can program (not all of them work; most do). Choose Play/Stop from this drop-down menu.
4. Continue choosing functions that match the parameter labels. When finished, click the Controllers tab. Name and save the MIDI ACT Controller preset, but keep it open.
5. Link the Komplete keyboard’s buttons to the functions you just programmed. Below each MIDI ACT Controller UI label are two cells. Click on the bottom cell, and the cell just below the label shows MIDI Learn. Hit the keyboard’s Play button; the function name replaces MIDI Learn, and now the Play button triggers the Play/Stop function (as confirmed by the cell name just below the label). Program the remaining cells similarly, by calling up the MIDI Learn function for each button, and hitting the appropriate button until you’ve linked all the buttons to the selected functions.
I mapped the Komplete keyboard buttons to the following functions: Play = Play/Stop (returns to where playback started), Rec = Record, Stop = Stop with Now marker, Loop = Loop on/off, Metro = Generate metronome during playback, Tempo = Snap to Grid on/off, Auto = Automation Read for selected track, Clear = Next Button Bank. But choose what you want—for example, you might prefer replacing the Automation Read function with navigation knob up or down for Zoom Out Horizontal, and Next Button Bank with navigation knob rotate for Zoom In Horizontal.
Next Button Bank selects the next Bank of buttons, out of four possible Banks. Note that after programming the functions for Bank 1, some leftover buttons aren’t assigned to anything. You can program additional functions in a different Bank with these buttons, but then you have to select that Bank, which also needs a Next Button Bank to get to the next Bank. I recommend using only Bank 1 to simplify matters, which still gives 8 control functions. But adventurous types can load up the banks with different assignments; for example, Bank 2 could choose screensets, views, or whatever.
Verify that all the Komplete keyboard buttons work as expected. Sometimes for unknown reasons, ACT may drop a button assignment. Open the ACT UI, re-assign (as described above), and keep going.
Komplete Keyboards as General-Purpose MIDI Control Surfaces
Let’s use the keyboard’s rotary controls with non-NKS instruments that have “MIDI Learn” capabilities, like Rapture Pro or Rapture Session. Insert Rapture Pro (or another instrument with MIDI Learn), select its MIDI track (click on the MIDI track’s number), and then choose Komplete Kontrol -1 > MIDI Omni for the MIDI track’s input. You must select the MIDI track for the instrument you want Komplete keyboard’s knobs to control.
Press the Komplete keyboard’s MIDI button (the mixer functions programmed previously persist). Right-click on any Rapture Pro knob (instrument page, or an Element knob). Choose MIDI Learn, and rotate a Komplete keyboard control to assign it. You’ll need to go past the initial setting before the control surface knob takes over.
To return to controlling an NKS-compatible instrument, press the Komplete keyboard’s PLUG-IN button. To control a non-NKS instrument with MIDI learn, press the Komplete keyboard’s MIDI button.
Limitations and Issues
Because there are only 8 knobs for non-NKS control, if you assign them to, for example, Rapture’s Instrument page, and then assign them to tweak parameters within an Element, Rapture’s Instrument page will still respond to the knobs. If you don’t want a knob to control a parameter, right-click on it and choose “MIDI Forget” before moving on. However, if you’ve loaded two instances of Rapture Pro, selecting the MIDI track for one instance causes the Komplete keyboard knob assignments to affect only that one instance.
For deep, hands-on synth programming, it’s possible to create custom, 4-page MIDI templates that can control up to 32 continuous controllers and 32 switch controllers. However, explaining how to do this would require another article as long as this one! So for now, with non-NKS instruments, it’s best to consider the Komplete keyboard controls more as a “scratchpad” for tweaking parameters during the editing process—not an option for a permanent, hands-on control surface. But if you have Rapture Pro or Rapture Session, it’s great to be able to control the 8 instrument controls from hardware.