Spoiler alert: there’s a really easy way to do this, as well as the usual, more traditional options
The post The Truth About Tempo Changes shows just how common tempo changes are in classic songs that have stood the test of time. So why do we record everything to a click? Convenience is one factor, and practicality is another. It’s easy to “feel” tempo changes when you have musicians playing in a room together, but for solo artists who rely on overdubs (as well as tempo-synched effects), that rhythm reference is essential to obtain cohesiveness.
I’ve used tempo changes in several ways over the years, with the two most common being during DJ-type sets to speed up or slow down over the last part of a song to match the tempo of the following song, and in rock music, inserting what I call “time traps”—sudden, very short tempo drops to add a slight pause and build anticipation/tension in strategic places (please see the post Use Tempo Change “Time Traps” for Extra Drama).
But now that I’ve seen—and felt—how important tempo changes are, I’m building them into my music more and more. Let’s look at various ways you can do this, starting with adding them during the composition/recording processing, and closing with my favorite option—a way to add tempo changes after the fact to finished song.
CREATING A CLICK TRACK WITH TEMPO CHANGES
Although you can always take the old school approach and record without a click, if you’re a solo artist it really helps to have a click for synchronizing delays, MIDI drum overdubs, etc. The trick is creating a click track with the desired tempo variations, and here are some ways to do that.
Create a click after recording an audio part that establishes the song’s tempo. For example, you play the song through in free time on guitar or piano, then use tempo extraction (as explained in the post The Truth About Tempo Changes) or create a tempo map using a recording program’s tap tempo functionality. With the latter, you tap along with the track, and the program translates the results into a tempo track. With tempo extraction, note that it’s most accurate when you have individual parts with a well-defined rhythm—doing extraction with program material is more likely to have errors.
Start a song with MIDI, then create tempo changes. With this method, you can play scratch tracks along with a metronomic click until you have the song’s framework in place. Then, go back and edit the tempo track to create changes in ways that will add emotional impact. After creating the tempo track, you can then record subsequent overdubs to the varying tempo track.
Start a song with audio, then create tempo changes. As with the MIDI example above, you’d record with a click, then add tempo changes after the fact—except this time, you’re recording audio instead of MIDI parts. This creates a more complex situation, because if you want to keep the audio you recorded, or even just follow along with it as you create replacement parts, the audio needs to stretch dynamically with the tempo changes.
Converting your part to an Acidized file or Apple Loop (standard, or contained in a .CAF file) is one possibility, but few programs offer that capability. Converting to a REX file will also work, but creating a long REX file is tedious and requires Propellerheads’ ReCycle. Some programs, like Ableton Live and Studio One, can stretch dynamically and as long as the changes aren’t too drastic, there will be no objectionable artifacts. Cubase offers various ways to stretch audio so that it conforms to a tempo map, like adding “hit points” that allow a file to follow tempo changes. Pro Tools has Elastic Audio, and so on.
If the tempo changes are “stepped” rather than linear (e.g., there’s a slight increase in successive measures), another option is to use the host program’s DSP to stretch audio a measure at a time to match the tempo changes you created with the tempo map.
TAKING ADVANTAGE OF A CLICK TRACK WITH TEMPO VARIATIONS
Because the click track now has variations, anything that can follow a click track—MIDI sequences, processors that sync to tempo, acidized and REX loops, and the like will follow the click. Remember too that one of the reasons for playing with a click is to tighten up timing, but hosts with audio quantizing options should be able to follow the tempo variations in a click.
ADDING TEMPO CHANGES AFTER THE FACT
This is by far the easiest way to add tempo changes. Fortunately, programs like PreSonus Studio One and Ableton Live make it easy to add tempo changes to a finished mix—so you can complete your song, and then add subtle tempo changes where appropriate. This also lets you compare a version without tempo changes, and one with tempo changes. You may not hear a difference, but you’ll feel it. Let’s look at how to do this in Studio One’s Song Page, and in Ableton Live. Note that you’ll need to add these tempo changes in a new song—open one up, and import the stereo mixed file. The only track we want when doing these kind of changes is the final, mixed track.
PREPARATION
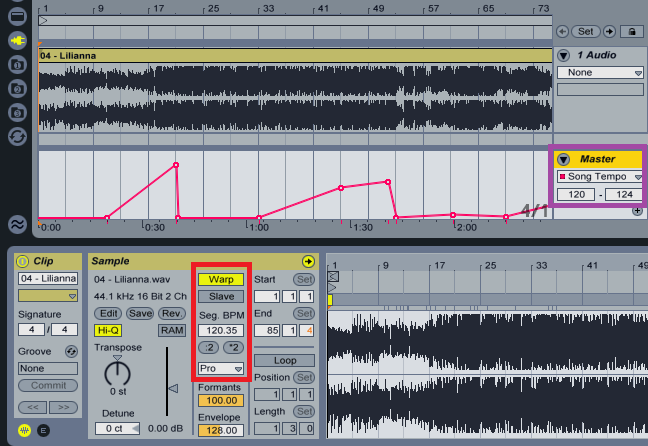
Ableton Live shows the tempo of an imported track as Seg. BPM in the Sample section (see the image above). Set the global tempo to match, then enable Warp, and choose the Pro algorithm for the best sound quality. Once you’ve prepped the file in the Sample section, then you can automate the tempo in the tempo tracks.
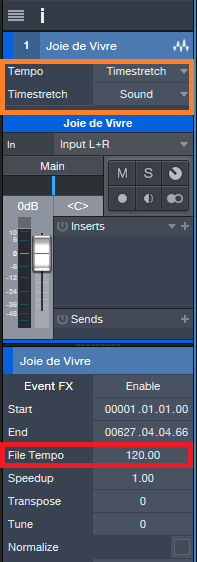
With Studio One, open the Inspector as shown below, and enter the song’s tempo under File Tempo (outlined in red; for example, 120 BPM). If you don’t know the tempo, it doesn’t matter—estimate the tempo, because you’re simply adding relative changes anyway instead of working with an absolute tempo. While you’re in the Inspector, choose Tempo = Timestretch, and Timestretch = Sound (outlined in orange). For the highest stretching fidelity, also choose Options > Advanced > Audio and check “Use cache for timestretched audio files.” This does offline analysis to stretch files instead of having to use a real-time algorithm, which improves quality so much you won’t be able to tell the tempo has been changed if the change is relatively small.
MAKING THE TEMPO CHANGES
With either DAW, edit the tempo track next. With both programs, this works similarly to adjusting any kind of automation.
In Live’s Master section, choose Mixer from the drop-down menu, and then Song Tempo (outlined in purple in the image above). In the two numeric fields below Song Tempo, enter the minimum and maximum tempo range. The tempo track height mirrors these values, so when adding small tempo variations (e.g., 120 to 124), you can make precise changes. The tempo track is a node-based automation envelope—double-click on the line to place a node, then drag it to the desired tempo and position. You’ll see a “tooltip” that reads out the tempo.
In Studio One, you can set high and low tempo limits within the tempo track; the minimum difference between high and low Tempo Track values is 20 BPM, however you can change the tempo track height to increase the resolution. To alter tempo, click to create a node in the tempo track, then drag it to the desired tempo and position. Another option is to place the playback cursor on the timeline, and click the tempo section’s + button to add a node under the cursor, as well as enter a precise value. This same field also displays the tempo at the playback cursor position. Like other Studio One automation, hovering the mouse over the line between two nodes displays a “phantom” node, which you can then click and drag to add a convex or concave curve to the tempo line. The bottom lines it that it’s possible to create very detailed tempo changes, quickly and easily.
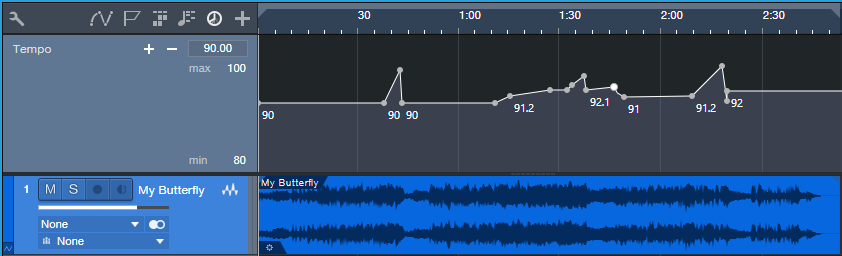
So what does it sound like? Here are two examples. Let’s first apply tempo changes to a relatively slow song, called “My Butterfly.” The tempo changes cover a pretty wide relative range, from a low of 90 to a high of 96 BPM. You may be able to hear the speedup in the solo, not just feel it, now that you know it’s there.
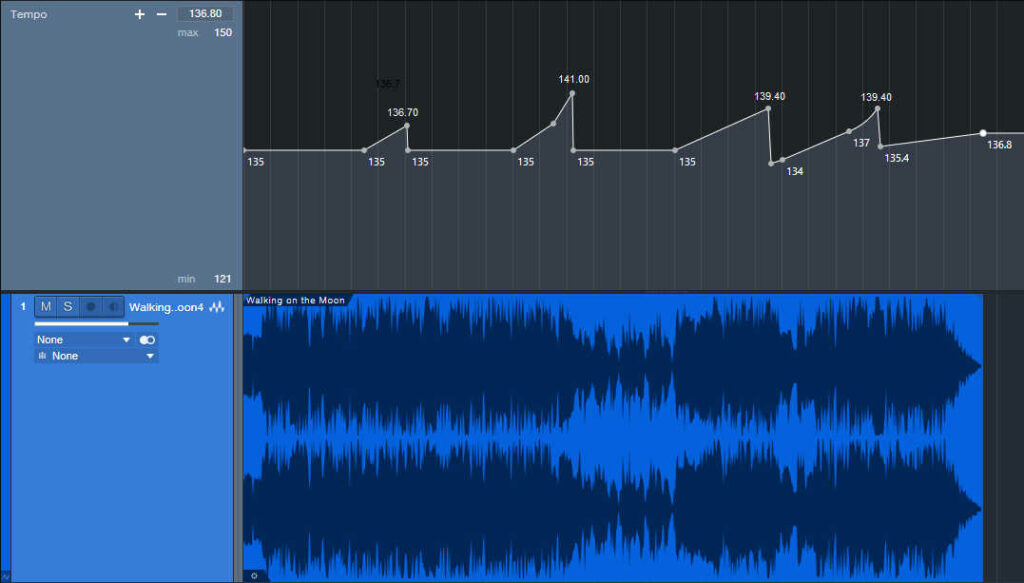
Next up is a hard-rock cover version of “Walking on the Moon” (originally recorded by The Police, and written by Sting). Yes, I know it’s weird to do a hard rock version…but listen for the tempo changes.
The differences are fairly significant, starting with a low of 135 BPM, going up to 141 BPM, and dropping down as low as 134 BPM.
Note that when possible, I make sure the tempo is relatively constant at the beginning and end. It doesn’t matter so much with songs, but with dance mixes, I can add tempo changes in the track as long as there’s a constant tempo on the intro and outro so DJs don’t go crazy when they’re trying to do beat-matching.
As to whether you can hear artifacts, for the relatively small tempo changes that help a song breathe, it’s not an issue with either of these programs. And is it worth taking the time to make these kinds of changes? All I know is that the songs I do with tempo changes get a better response than songs without tempo changes. Maybe it’s coincidence…but I don’t think so. So free your song from click-track monotony, and let it “breathe” and flow like music used to do—and still can.