Sidechaining is super-useful—but with a little more effort, you can take advantage of multiband sidechaining
This is a fairly complex setup, but listen to the demo and you’ll hear why I think it’s worth checking out…the effect is almost like using a vocoder to modulate one instrument with another, although in the context of this kind of modulation, the following approach gives you almost infinite possibilities. This technique is ideal for EDM, but it’s something I’ve used in rock and pop as well.
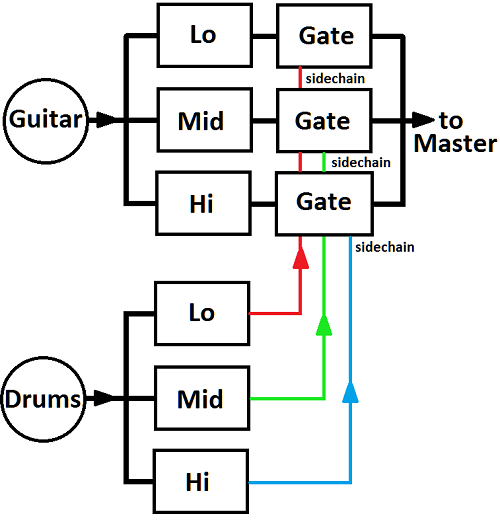
The block diagram above shows the basic concept. Let’s say you want to modulate a guitar power chord with drums. The overview is you split the guitar into three frequency bands, each followed by a gate. Then you split the drums into three bands, and use each band to drive the sidechains on the gates that control the associated bands on the guitar. So when the kick hits, you hear the power chord’s low frequencies, a snare opens the midrange, the high-hats open the highs, etc.
SETTING UP A FREQUENCY CROSSOVER
Multiband compressors can serve as crossovers if you don’t have a crossover option per se built into your DAW. Three multiband compressors (set for no compression, i.e., a ratio of 1:1) can act as crossovers to split the guitar into low, mid, and high frequency bands. One way to do this is to insert each multiband compressor in its own bus, then use sends from your signal source (such as guitar) to the buses.
To set up the crossover frequencies, solo a bus and tune its multiband compressor to cover the guitar’s low frequencies. Most multiband compressors will let you solo individual bands, so solo the band you’re currently tuning to mute the other bands. Next, copy the compressor’s settings (e.g., save as a temporary preset which you then load into the other compressor, or drag the first compressor into the next bus). Leave the low band as is, but solo the midrange bus, and adjust the multiband compressor’s band splitters to tune one of the bands to the guitar’s midrange. Solo the multiband compressor’s midrange band so you don’t hear the other bands.
Similarly, solo the third bus, leave the low and midrange bands as is, solo the third band, and adjust the multiband compressor frequencies to cover the high band. Finally, insert a gate after each multiband compressor.
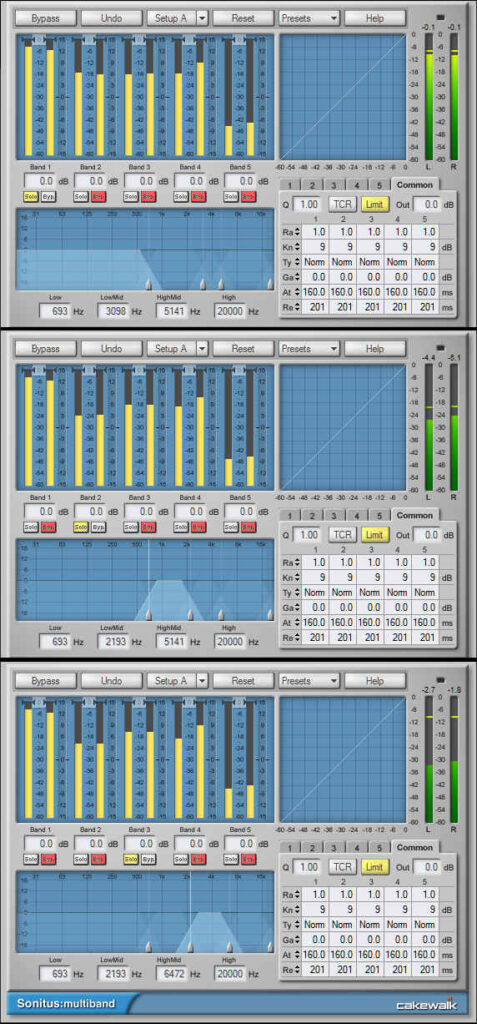
We’ve now split the guitar into three bands. Fig. 1 shows the multiband compressor settings for Cakewalk, but other DAWs work similarly.

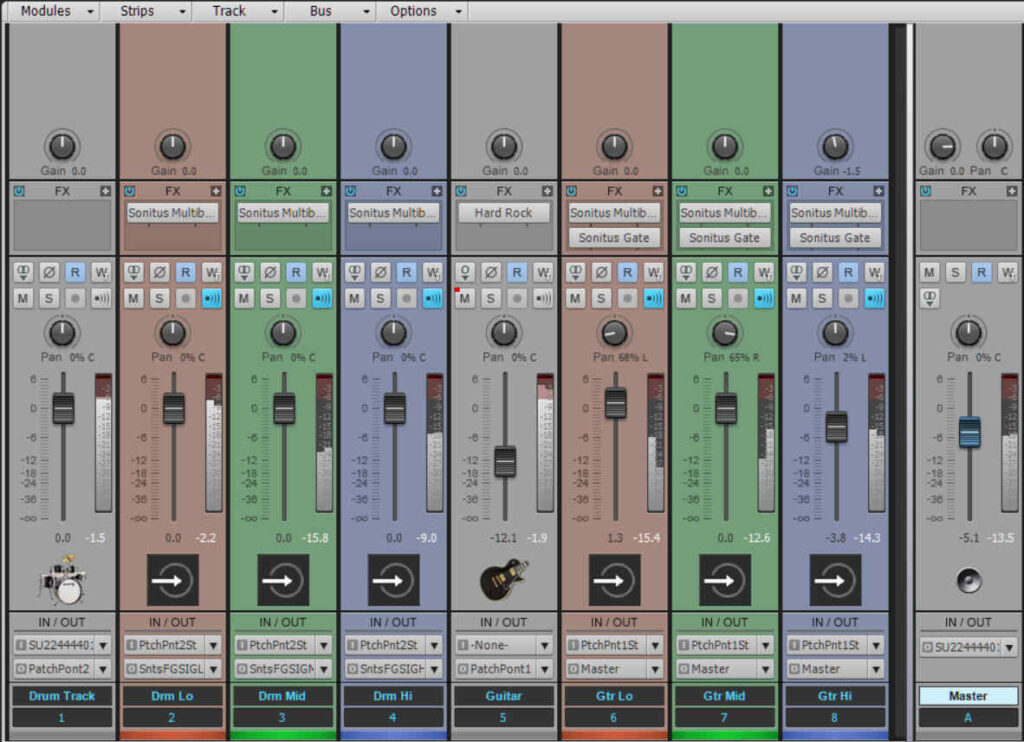
Now we need to do something similar for the drums, to split it into three bands for triggering the guitar’s gates. Send the drums to three buses, each with its own multiband compressor. Because the multiband compressors are already tuned for the guitar, we can just copy the settings and apply them to the drum compressors. Fig. 2 shows the mixer setup for Cakewalk, but again, other DAWs will be similar. You may need to tweak the crossover frequencies for the drums later on, but you’ll be close.

OPTIMIZING THE SETTINGS
I find it easiest to tweak one band at a time. For example, mute all tracks except the drum audio track, the guitar audio track, and their low bands. Start playback, and adjust the guitar’s low band Gate to respond to the drums. Now here’s the “but wait, there’s more” option: you can tweak the Gate’s attack, hold, and release time to make the gating more percussive, softer (increase the attack a bit), or even try ducking and other tricks. Similarly, adjust the mid and high frequencies, and you’ll have a heckuva rhythmic guitar chord.
ABOUT THE AUDIO DEMO
The demo plays four measures of the guitar and drum audio by themselves, four measures of the gated guitar and the drum audio, and finally, just the gated guitar by itself while it fades out.
