Aux/send buses allow for a variety of audio processing options
Aux buses, whether in a hardware mixer or within a program’s virtual mixer, are often underutilized. Most people know how to use them to add reverb to a bunch of channels or create a separate monitor mix, but an aux bus can do a lot more. We’ll cover some aux bus tips, but first, let’s review the basics.
AUX BUS BASICS
A mixer includes several buses, which serve as a common destination for signals from individual channels. The most important is the main stereo bus. You mix channel signals to this bus, usually through faders. This bus terminates in a stereo output that can be rendered into a final stereo mix.
Individual mixer channels have additional controls for regulating the level going to auxiliary (aux) buses. With software mixers, it’s common for every channel to include a virtual level control for all available buses. With hardware, where each control adds to the cost, sometimes you’ll find one or two level controls that switch to different buses.
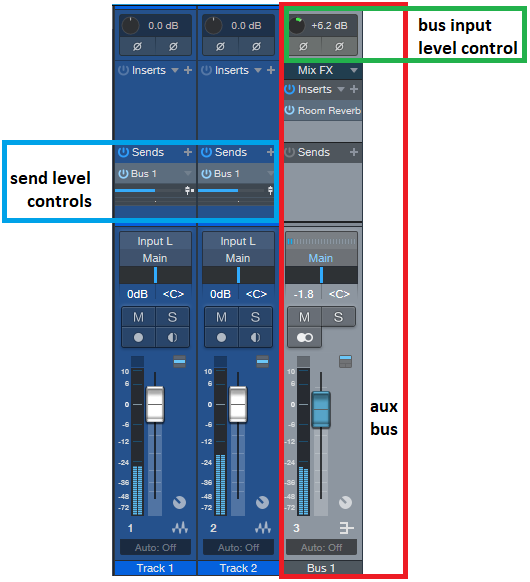
A typical aux bus application adds reverb to an overall mix. For each channel that requires reverb, its aux bus level control feeds some signal to the aux bus. In the image above, the bus send level controls (outlined in blue) feed the Aux Bus (outlined in red), into which a reverb is inserted. The bus input level control (outlined in green) adjusts the signal level going to the bus’s processor.
The mixer sends the aux bus output to the reverb input (sometimes aux bus outputs are labeled as sends). The reverb output comes back into the mixer either though a standard channel input, or a special input called a return that’s dedicated to receiving the output of a signal processor being fed by an aux bus. Some programs include dedicated effects return channels in addition to standard aux/bus channels.
The signal entering the aux bus can come from either before or after the fader that feeds the main stereo bus (respectively called a pre-fader or post-fader signal). If you want the reverb to go away when you pull down the main fader, choose post-fader. If you want a constant amount of reverb regardless of the level, choose pre-fader.
WHY GAIN-STAGING IS IMPORTANT
There are three places to alter levels within an aux bus:
- A channel’s aux send control
- The main channel fader (if the aux send control is set to post-fader)
- A master send control, or bus input level control, that regulates the overall bus level. This control allows “scaling” the individual send controls as a group without having to adjust each one separately.
Furthermore, any signal processor the aux bus feeds may have input and output controls. There may also be a level control for the signal returning to the mixer.
These controls must be set correctly: overly hot levels can cause distortion, while too low a level can lead to an unfavorable signal-to-noise ratio. Here’s the general procedure for proper level-setting:
1. Set the input of the effect being fed by the aux bus to unity gain (i.e., the signal is neither amplified nor attenuated).
2. Set the bus master send control to unity gain.
3. Adjust the individual send controls for the desired amount of effect. The higher you turn the individual send controls, the more that channel will contribute to the effected sound.
4. As the sends from the individual channels start to add up, they may overload the processor’s input. Leave the processor input at unity gain, and use the master send control, or bus input control, to reduce the level going to the effect.
If the signal going to the processor is too low, then use the master send control or bus input control to bring it up. If turning it up leads to distortion at the mixer and there still isn’t enough level, increase the processor’s input level as needed.
USE PROCESSED (WET) SOUND ONLY IN BUSES
Any effects in the aux bus send/return loop should be set to wet (processed) sound only. The channel faders already provide the dry sound.
PARALLEL COMPRESSION
Engineers usually put compression in channel inserts so that the compression affects only a particular channel. However, one cool compression effect called parallel compression is to route compressed and dry sounds in parallel. The dry sound provides the peaks and dynamics, while adding in the compressed sound brings up the lower-level sounds to give more punch.
Mix controls for compressors are becoming increasingly common, although not every dynamics processor allows setting a blend of dry and processed signals. Fortunately, an aux bus has you covered. Send some signal from the channel you want to “punch up” to the aux bus, insert a compressor in the bus, then return the compressor output to the console. This technique is particularly effective with drums and percussion, although any mostly percussive instrument (piano, electric bass, guitar, etc.) can benefit.
ISSUES WHEN COMBINING DIGITAL AND ANALOG EFFECTS
When an aux bus signal leaves a digital mixer to go to an analog processor, latency comes into account. At the very least, the theoretical minimum is a 1 to 2 ms delay caused by going through a D/A converter to the analog device, followed by returning through an A/D converter.
In some cases, this won’t matter—an extra millisecond of pre-delay going to a reverb, or a 1 ms delay in the reverb output, is pretty much inconsequential. But if you’re using something like a compressor, the sound is similar enough to the dry sound that you might hear problems, such as comb filtering, caused by the compressed signal being slightly delayed.
Fortunately, most software programs include external insert plug-ins, which basically treat external processors as if they were plug-ins. These can “ping” the send/return loop, measure the delay, and compensate accordingly. Otherwise, you can always slide the track containing the processed audio forward in time with respect to the other tracks to compensate.
With hardware digital mixers, note that if the aux out is digital and feeds a digital effect, you won’t experience this problem.
ADDITIONAL BUS APPLICATIONS
There are plenty of other applications, such as using one bus to feed a vocoder’s modulation input and another to feed its carrier input, so that any signal can “vocode” any other signal. This technique also works well with ring modulation (another dual-input effect), and with effects that have keying inputs (such as noise gates). For example, with the noise gate, the drum kick and snare could feed the gate in, while a sustained synth pad feeds the audio in. The kick and snare will gate the pad on and off, creating an interesting rhythmic effect.
Another useful trick is to put a distortion box set for light distortion in the aux bus. When you want to dirty up a channel a bit, use its send control to shoot some signal into the distortion box. And the list goes on…get creative, have fun, and get on the (aux) bus.