Delay-based mono-to-stereo conversion doesn’t have to sound “phasey” and weird when collapsed back to mono
It wasn’t always a stereo world—vintage synthesizers, guitar, bass, and vinyl records are just some examples of the Monozoic era in sound and music. One common technique to turn mono into stereo is sending the mono track to another track through a relatively short delay (like 25 ms). You then pan the original track and delayed track oppositely. However, if the signals collapse back to mono, then there’s a strong possibility of significant cancellation—and a thin, “phasey” sound.
You can try to minimize this by inserting the Mono Utility plug-in into the master out, adjusting the delay time for minimum cancellation, then returning to stereo. You won’t be able to avoid cancellation entirely, but tweaking the time may keep it from being objectionable (especially once the delay time gets above 25 ms or so, because that’s more into doubling range). To make any phase issues even less noticeable, you can lower the delayed sound’s level a little bit to weight the sound more toward the dry sound.
But there’s a better option, and it lends itself well to being made into an Effects Rack.
The Mono-to-Stereo Conversion Effects Rack
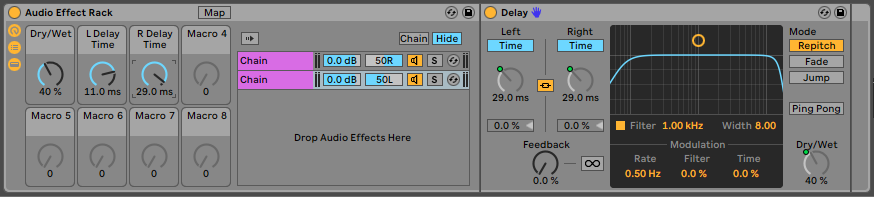
This rack requires two parallel chains, each with a delay effect, and panned oppositely. The settings shown in the screenshot above are pretty close to optimum, but the linked Time parameters for the left and right delays are brought out to their own Macro Controls. Also, the dry/wet mix controls are brought to a single Macro Control so that they both change together (Fig. 1).
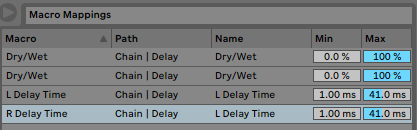
The delay range for the Macro controls is 1.00 to 41.0 milliseconds; anything longer than that starts turning into a audible echo effect. The Dry/Wet Macro goes from 0 to 100%, but you’ll probably keep this at 40% or under.
My usual delay settings are 11 ms for one delay, and 29 ms for the other; the timing difference gives the stereo spread. So to recap, we have a dry signal common to both the left and right channels, a delayed signal in one channel, and a signal delayed by a different amount in the other channel.
Adjusting the Controls
As mentioned, 11 ms and 29 ms good choices for the delay times, but not the only ones. I generally prefer prime number delays (3, 5, 7, 11, 13, 17, 19, 23, 29, 31, 37, 41 ms) so the delay timings don’t interfere with each other. The more delay, the more apparent the stereo imaging.
The Dry/Wet mix controls the image width. The wetter the setting, the wider the image, but that increases the potential for cancellation when summed to mono. I find 30% wet works well. If you want to tweak this, insert the Mono Utility plug-in in the master bus, and start with 0% wet for the mix control. Turn up the Dry/Wet Macro control (or if you haven’t done a Macro mapping, adjust both controls equally) until the sound just starts to get “phasey,” then back off a bit. When you return the main output to stereo, you’ll still have a convincing stereo spread.
One reason this is so effective is because the dry sound appears in the center. So, there’s a center-channel build-up when the stereo sound is collapsed to mono. This increases the dry signal level compared to the sides, which also balances levels better between the stereo and mono modes.
I came up with this primarily for guitar and my beloved vintage Minimoog, but it works wonders with any mono source—it’s even useful with voice. And if the audio gets collapsed back to mono for any reason, the sound won’t disappear into a phasey void. Mission accomplished!