Ableton Live makes a great MIDI router for live performance keyboard rigs
Ableton Live is a pretty chameleonic program, but some people don’t realize it can even serve as a MIDI data router — whether in the studio or for a live performance keyboard rig. You can create sophisticated splits and layers, suitable for feeding soft synths or external MIDI keyboards, which can also be processed by MIDI effects.
SHOW US YOUR RACK
Live’s Rack feature is what makes this possible. It lets you create parallel chains (with MIDI zoning) of MIDI effects, instruments, and signal processors within a single, integrated device.
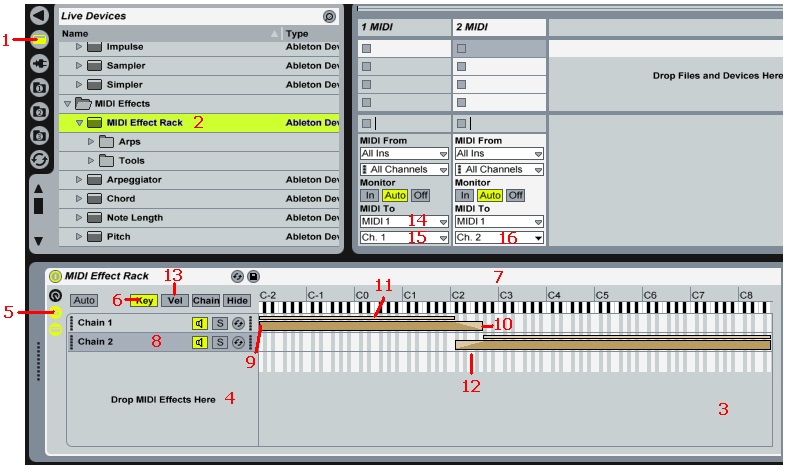
Referring to the above diagram,, create a MIDI track in the Mixer Drop area by going Insert > MIDI Track. Now click on Live’s Device Browser (1; numbers in the text refer to callouts on the screen shot). For driving external MIDI devices, under MIDI Effects, drag the MIDI Effect Rack (2) into the Track View (3). If instead you want to drive soft synths within Live, under Instruments, drag the Instrument Rack into Live’s Track View.
Let’s assume you want to drive external keyboards; the track should stay MIDI-only so it can feed a port on your MIDI interface. So, drag-and-drop any MIDI effect into the rack where it says “Drop MIDI Effects Here” (4). Velocity is a good choice, as you might want to compress the velocity values. Even if you don’t plan to use the effect, if you’re not using a soft synth you need a MIDI effect in the chain to be able to create zones.
Next, click on the Show/Hide Chain List button (5). Then, click on the Key button (6) to see a keyboard graphic (7) that serves as a Zone Editor. To create more zones, you’ll need to create one Chain per split or layer. So, drop another MIDI effect into the “Drop MIDI Effects Here” box (4); another Chain will appear (8) and add its own zone to the Zone Editor. Next, edit your zones by simply clicking on the start or end of the lower, larger strip in the Zone Editor (the cursor turns into a little bracket), then dragging the strip to the desired lower (9) and upper (10) note limits.
Also note the thinner strip (11) above the thicker strip: This lets you create positional crossfades (12) so that one zone fades out while another fades in. To create a crossfade, position the cursor over the start or end of the thinner strip, and drag to the point where you want the fade in to end or the fade out to start, respectively.
You can also route MIDI notes to different chains according to velocity by clicking on the Vel button (13). An editor similar to the Key zone editor appears where again, you can drag on the strip start and end points to create particular velocity zones (e.g., only higher velocity notes go to a keyboard).
WHAT ABOUT THE TONE MODULE?
Now we’ve created our splits and layers. What happens next depends on how your external device handles incoming MIDI messages.
If you have a multitimbral device where each sound can be assigned to any MIDI channel, on Live’s MIDI track, set MIDI Out to the desired interface port (14), and choose a channel in the field below (15). Now set the tone module’s two (or more) sounds to the channel you chose.
If your multitimbral device has fixed channel assignments (sound 1 always responds to channel 1, sound 2 to channel 2, etc.), then each split or layer needs its own MIDI track to allow for different channel assignments. One way to do this is to create all your chains in one MIDI track, then copy the track for as many times as you have splits or layers (to copy, ctrl+drag the track in the Mixer Drop Area). Delete all but one chain in each track; for example, if two chains are creating a split, delete the second chain in the first track, and the first chain in the second track. Now you can make independent channel assignments for each track/split (16). The same principle applies to layers.
WHAT ABOUT VIRTUAL INSTRUMENTS?
These techniques also apply to virtual instruments, except that you’ll drag in an Instrument rack instead of a MIDI rack from the browser, and you don’t need to insert a “dummy” MIDI effect to make the Zone Editor appear; it will appear upon inserting a soft synth (although you may find the MIDI effects useful anyway to do velocity scaling, arpeggiation, create chords from notes, etc.). Drag more soft synths into the rack to create additional chains. From that point on, set the Key and Velocity splits and layers as described above. Done!