
Everyone seems to use compression on vocals, so here are five tips to increase compression’s effectiveness
There’s no shortage of “pro vocal compressor tips” on YouTube and other places, but a lot of them cover the same ground. In this article, let’s look at some crucial compressor characteristics that may not have gotten the attention they deserve elsewhere.
1 BE SKEPTICAL OF COMPRESSOR PRESETS
A dynamics processor’s effect depends on the input level. It stands to reason: if the input level is low enough not to exceed the compressor’s threshold, no compression will occur. But if the level is above the threshold more than anticipated, the preset will squash the sound.
Unless you know the input level for which a preset was optimized, be wary. Although many presets assume an input level where peaks reach 0 dBFS or close to it, that’s not always the case. Feel free to start with a preset, but vary the all-important input gain control until your ears tell you the preset is acting as it should. Even better, practice with compressors enough to develop your own presets—and optimize them for a consistent input level.
2 THE COMPRESSOR’S KNEE SETTING MAKES A HUGE DIFFERENCE
A rounder knee (Fig. 1) starts compressing slightly before the compressor’s threshold. The compressor doesn’t attain the full amount of compression upon exceeding the threshold, but somewhat after exceeding the threshold. This smooths the transition into a compressed sound.
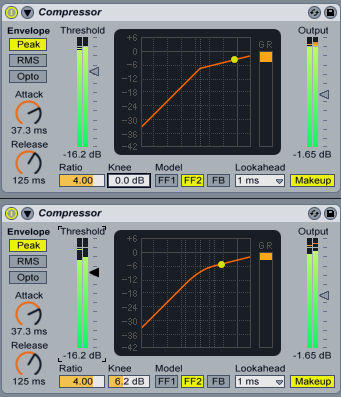
With many vocalists, a rounder knee is best because it provides a more transparent compression effect when the signal transitions from uncompressed to compressed. However with more staccato vocals, a harder knee clamps down levels more tightly, which can provide more of a sense of urgency.
3 WHY ATTACK TIME IS IMPORTANT
The shorter the attack time, the more the compressor clamps down on transients. However, those transients play a major part in determining a vocal’s intelligibility. If the consonants at the beginning of vocal phrases aren’t coming through clearly and distinctly, lengthen the attack time—try around 30-40 milliseconds.
4 USE BYPASSING AS A REALITY CHECK
Bypass the compressor often to compare the unprocessed and processed vocal sound. But the comparison needs to match peak levels, especially if you’re using compression to gain more headroom (otherwise, matching RMS levels might be a better choice). Adjust the compressor’s output gain control so that the compressed vocal reaches the same peak level as the dry vocal—that’s the only realistic way to hear how compression is affecting the overall gain reduction on the vocal’s peaks.
5 TAKE ADVANTAGE OF SPECIAL OR UNIQUE COMPRESSOR FEATURES
Many compressors incorporate special features to achieve a competitive advantage. Some of these include:
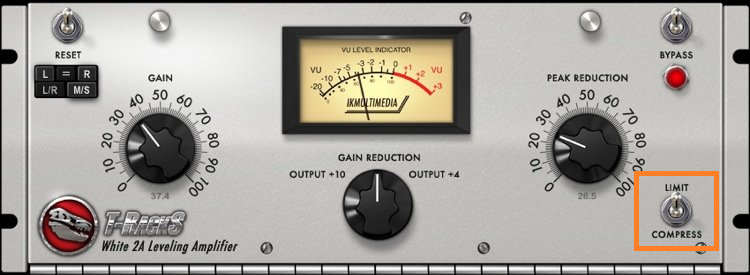
- Different compression curves, like a curve that mimics vintage electro-optical compressors (e.g., Universal Audio’s famed LA-2A). This can be a great choice for vocals, because the amount of compression tapers off somewhat on peaks. The result is a more dynamic type of compressiokn sound, and is probably one of the reasons people love optical compressors on vocals.
- Limiter option in addition to compression. In some cases, limiting might be more appropriate because unlike compression, which tapers off the level above the threshold, limiting stops level changes above the threshold. Shaving off only the top of the peaks, instead of compressing the dynamics, can give a more natural sound. Software emulations of the LA-2A, like IK Multimedia’s T-RackS White 2A, invariably include this option (Fig. 2).
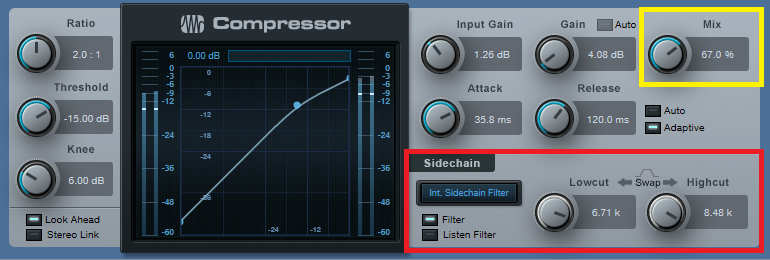
- Mix control for parallel compression, which retains more of a vocal’s percussive nature.
- Automatic output gain compensation. Of course you can always set the output gain yourself, but by smoothing out level differences somewhat, this feature makes it easier to compare different compression amounts as you experiment with the control settings.
- Built-in dynamics processing options other than compression for higher levels, such as expansion for lower levels to get rid of handling noise and mic preamp hiss.
- Internal sidechain for de-essing (Fig. 3).
Finally, remember that no law says you have to use compression on vocals. Sometimes good mic technique, a singer with dynamic control, and a little limiting is all you need to get a natural, vibrant sound.
Feature image photo credit: Spencer Davis