There’s more to miking than just sticking a mic in front of a cabinet
To mic a cab, you just point a mic in its general direction, right? Yes…and to get to the moon, just jump real high. Actually, there’s much more to miking than meets the ear, as you’ll find out from these tips.
CHOOSE THE RIGHT MIC
For dynamic mics, the inexpensive Shure SM57 is the classic guitar cabinet mic—many engineers choose it even when cost is no object. The Electrovoice RE20 and Sennheiser MD421 are more upscale. Condenser mics, though often too sensitive for close miking loud amps, make good “secondary” mics—placing one further back from the amp adds definition to the primary dynamic mic. AKG’s C414B-ULS is a great, but pricey, choice; their C214 gives similar performance for much less. Neumann’s U87 is beyond most budgets, but the more affordable Audio-Technica AT 4051 has a similar character (it’s great for vocals, too). And don’t forget ribbon mics: they have a “warm” personality, and a polar pattern that picks up sounds from the front and back—but not the sides. In multi-cab guitar setups, ribbon mics let you do cool tricks by choosing which sounds to accept and which to reject based on mic placement. Among newer mics, Royer’s R-121 and R-101 are popular for miking cabs.
THE MIC PLACEMENT “FLIGHT SIMULATOR”
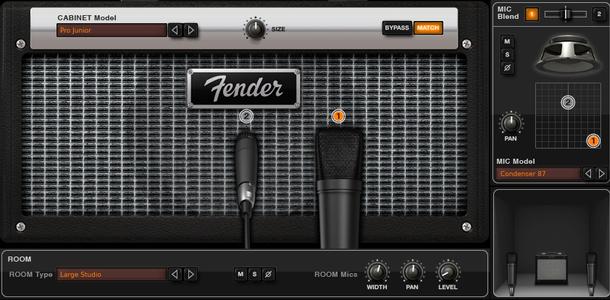
Most amp sims lets you move “virtual mics” around in relation to the virtual amp. The results parallel what you’d hear in the “real world,” and you can learn a lot about how mic placement affects the overall sound; IK Multimedia’s AmpliTube (above) is particularly good in this respect.
MIC ATTENUATOR PADS CAN REALLY HELP
Many mics have switchable attenuator switches (called “pads”) to lower the sound level, for example by -10dB. With loud amps, engage this to avoid distortion.
THE IMPORTANCE OF MIC PLACEMENT
Start off with the mic an inch or two back from the cone, perpendicular to the speaker, and about half to two-thirds of the way toward the speaker’s edge. To capture more of the cabinet’s influence on the sound (as well as some room sound), try moving the mic a few inches further back from the speaker.
Moving the mic closer to the speaker’s center tends to give a brighter sound, while angling the mic toward the speaker or moving it further away provides a tighter, warmer sound. Also, the amp interacts with the room: Placing the amp in a corner or against a wall increases bass. Raising it off the floor also changes the sound. Also note that each speaker in a cab should sound the same, but that’s not always true; mic each one and listen for any significant differences.
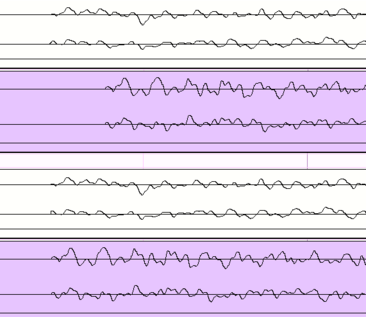
ISSUES WITH GOING DIRECT AND MIKING
Some amps offer direct feeds (sometimes with cab simulation); combining this with the miked sound can give a “big” sound. However, the miked sound will be delayed compared to the direct sound—about 1 ms per foot away from the speaker. In the screen shot below, the top waveform is the direct feed, and the second one down is the miked audio. Nudging the miked sound earlier in your recording program lines up the miked and direct sounds so they are in-phase.