Double-tracking is the process of recording a new part that duplicates a previously recorded part. The goal is to combine the two parts for a bigger sound, or sometimes with mono instruments, to create a stereo image from the two tracks.
When playing a second part, there will be slight timing, and perhaps pitch, variations. These variations keep the part from sounding like the original part was simply copied to another track. However, it can be difficult to play a second part that’s tight enough (especially with complex rhythms or fast lead parts). A common workaround is to do automatic double-tracking (ADT) with an electronic effect, like a Chorus/Doubler.
The Problem with Electronic ADT
With traditional double-tracking, the double-tracked part would sometimes be slightly ahead of the original track and sometimes, slightly behind. However, electronic ADT generally uses delay-based processing. So, any variations can only lag, typically by 10 to 20 ms. Real double-tracking isn’t like that, so this tip provides a solution that sounds much closer to “the real thing.”
The following describes this technique for Studio One. However, the same concept applies to Pro Tools, Cubase, Live, MOTU, and most other DAWs.
Option 1: Artist Version
The solution is to create a copy of the original track that’s dedicated solely to providing the double-tracking effect. Processing it requires two Analog Delays in series, followed by a Mixtool (fig. 1).
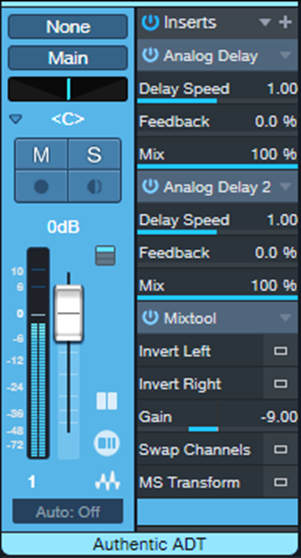
Figure 1: The Authentic ADT effect requires its own track. This is a copy of the original track.
Suppose the initial Analog Delay setting for both delays is 20 ms. Because there are two delays in series, this means the total initial delay setting is 40 ms. So, move the copied track with the Analog Delays 40 ms ahead (earlier) on the timeline. Now, the initial delay isn’t delayed compared to the original track—although the copied track is 40 ms ahead, the Analog Delays’ initial times delay it by 40 ms.
As a result, by adding modulation to the Analog Delays, the copied track can now lead and/or lag the original part. You can then mix the original and copied parts for the desired balance and pan positions.
About the Delay Settings
Fig. 2 shows the initial delay settings for the two Analog Delays.
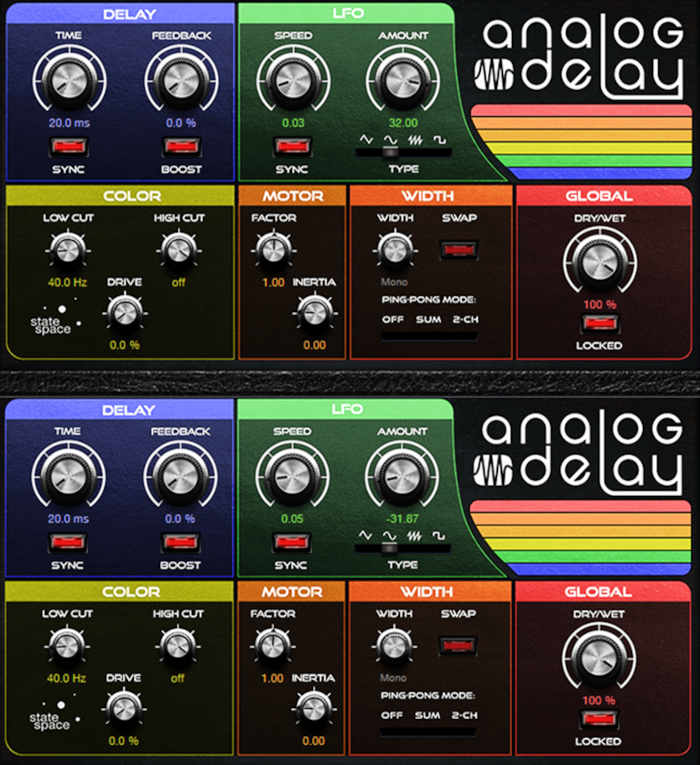
Figure 2: Initial Analog Delay settings. Note that the settings are identical, except for the LFO Speed and Amount.
Modulating the two delays with different LFO Speeds and Amounts creates a more randomized effect. So, the longest, and shortest, delays happen only when the maximum variations of the two LFOs coincide. Otherwise, the delay time changes constantly.
You don’t have to use an initial delay of 20 ms. Delay times from 13 to 25 ms work well, but do use the same delay time for both Analog Delays. For whatever value you choose, move the copied track ahead in time (compared to the original track) by twice the amount of the delay time setting.
Option 2: Extended FX Chain
The basic setup is the same as the Artist Version. The above comments apply to the Authentic ADT Extended FX Chain too. However, the Macro Controls (fig. 3) have been constrained to useful settings.
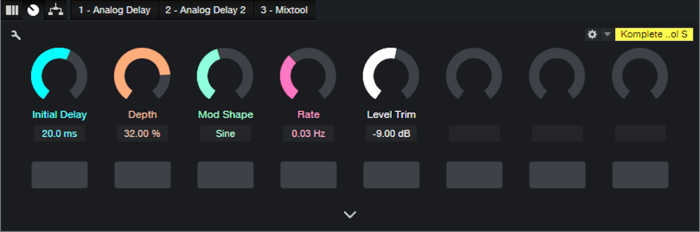
Figure 3: Macro Controls panel for the Authentic ADT FX chain.
The controls are:
- Initial Delay controls the time on both delays simultaneously. The maximum delay is 25 ms because with two delays in series, the initial delay can go as high as 50 ms. If the LFO modulation reaches the maximum amount of delay, the sound is perceived more like slapback echo. Note that this can add to the realism if it happens only occasionally. The minimum initial delay is 13 ms. Shorter delays produce a tighter sound, with fewer variations.
- Modulation Depth and Rate are to taste. I adjust these for the most convincing doubling effect, but also, for minimal flanging when summing the original and doubled tracks to mono. This is in case the music ends up being played back in mono. However, that’s a worst-case scenario. This technique is designed for stereo, with the original and copied tracks panned oppositely from each other (not necessarily full left and right, just oppositely).
- Mod Shape affects only one of the delays, but can create interesting effects. A sawtooth shape, with the other delay being modulated by a sine wave, may give good results if the audio isn’t too continuous. Square can be useful with very low Width settings. Regardless, you’ll probably use the sine or triangle wave modulation more often.
- Level trim sets the Mixtool’s Gain.
Once you hear the audio example, I wouldn’t be surprised if you use this technique whenever you want a double-tracked part.
Note: This tip is included in The Huge Book of Studio One Tips and Tricks eBook, with 320+ tips. It includes an FX Chain for Option 2 ADT effect, with the Macro Controls in fig. 3. A Pro Tools-specific version is included in the eBook Innovative Techniques for Pro Tools, with 130+ tips. It includes a ptxp Track Preset for the ADT effect.