Ripple editing is useful not only with video, but with arranging for audio projects
Ripple editing has been a staple of video editing, and now it’s working its way into audio programs. This type of editing automatically moves content on the timeline after performing edits that add or remove time, thus completing some editing operations automatically. For example, if you cut a section of a song, the “hole” that’s created closes up automatically so where the cut ended slides left to join the start of the cut section. Or, if you take the part you cut and paste it, the song will open up enough space to hold what you want to paste—it’s not necessary to open a space, and then paste. Actually, I’ve always thought of ripple editing as editing the timeline, and the clips go along for the ride.
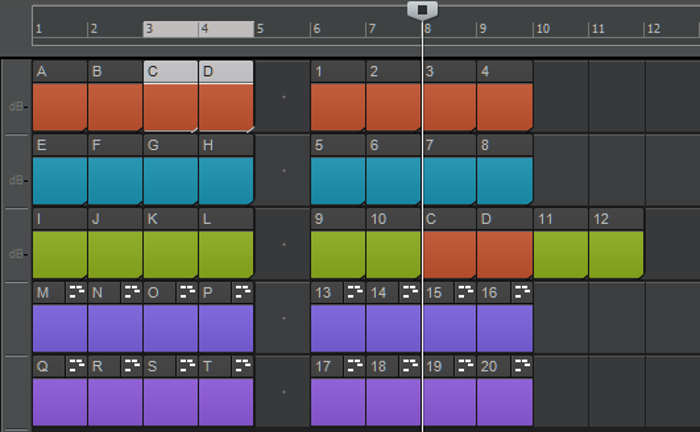
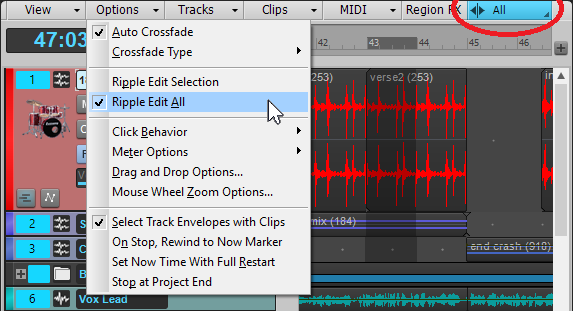
This article deals with ripple editing in Cakewalk, but the same principles apply to almost all programs that offer ripple editing. For example, Cakewalk offers two ripple editing options, chosen from the Track View Options menu: Ripple Edit Selection, and Ripple Edit All (Fig. 1). For example, suppose you move a clip from measure 3 to measure 5. If Ripple Edit All is selected, all clips on all tracks after measure 3 will move two measures to the right. With Ripple Edit Selection chosen, only the clips on the track where you moved the clip will move two measures to the right.
Before going any further, always remember the cardinal rule of how to avoid unintended consequences with ripple editing in any program: turn off ripple editing after doing an edit, so you don’t move clips around accidentally. If you leave ripple editing on inadvertently and start moving clips, you may end up moving ones that are far enough down on the timeline so you don’t see the results—until it’s too late to do anything. Well, other than hitting Undo a lot.
In addition to being extremely useful when doing arrangements, ripple editing is also helpful for assembling album song orders when mastering. You can move song clips around to try out different song orders, and the other songs will automatically open up to accommodate new song placement, while closing up where the clip used to be.
Following are some examples of how ripple edit works, for both Ripple Edit Selected and Ripple Edit All.
Ripple Edit Selected
Referring to Fig. 2, audio clips C+D in the left group, which are highlighted in the upper screen image, have been copied. (Note: So that it’s easier to visualize each clip as a solid block, Cakewalk’s View > Display > Display Clip Contents is unchecked.) Placing the focus on Track 3, inserting the Now time at measure 8, and choosing Paste pastes C+D on Track 3, starting at the Now time, and pushes clips 11 + 12 to the right to make room.
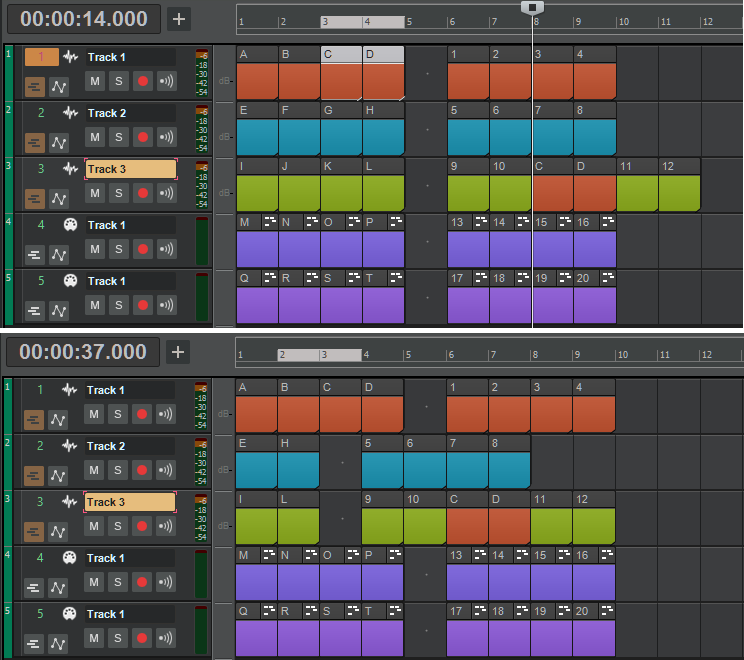
Next, let’s cut clips F, G, J, and K from the upper screen shot. The lower screen image shows the results: the clips to the right of G and K have shifted to the left starting where F and J had been, respectively.
Ripple Edit All
As an example of Ripple Edit All, refer to the upper screen image in Fig. 3. Suppose you want to copy clips 2, 3, 6, 7, D, 11, 14, 15, 18, and 19 (in the middle of the right group), and insert them at measure 2. Select the measures you want to insert, copy them, place the Now time at measure 2, choose Track 1 as the focus (i.e., the focus should be the highest-numbered track of the selection), and Paste. The lower part of the screen shot shows the result. The selected clips have been pushed to the right, due to the space opened up by copying these clips starting at measure 2.
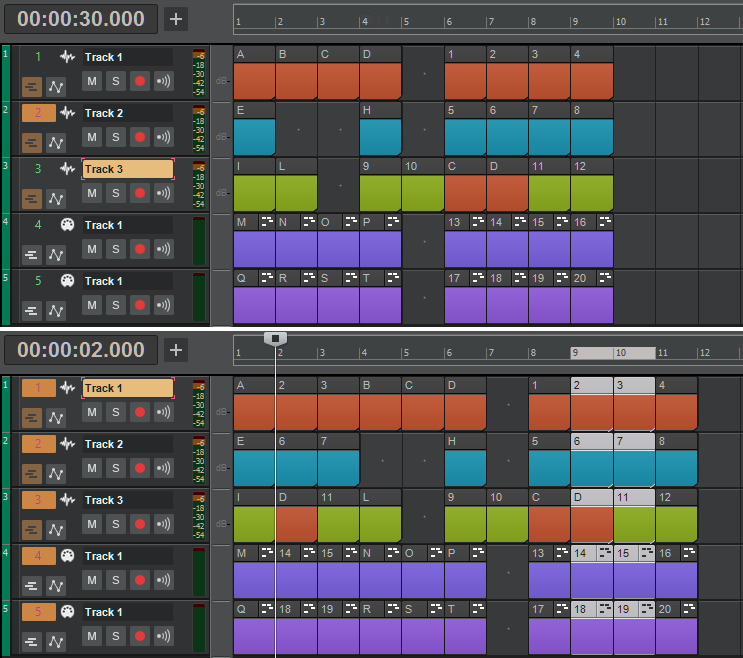
With Ripple Edit All, it’s also easy to delete “holes” (and unlike the old “Delete Hole” command, you no longer need data in the hole to make this happen). If nothing is selected and you drag across the timeline to define a region, this automatically selects All tracks and therefore, all clips within the region. Hit delete, and the group of clips that was to the right of the clips being deleted now move left, to the beginning of where the deleted clips originally began. Also note that if Ripple Edit Selected is enabled instead of Ripple Edit All and you drag across the timeline to select a region, and if one or more tracks are selected, the hole will be removed only for those selected tracks.
Ripple Editing with MIDI
Compared to audio data, ripple editing with MIDI data is more complex, and varies a bit more from program to program. Here are some examples of how ripple editing affects MIDI notes with Ripple All selected (see Fig. 4).

In [A], the clip highlighted in red is about to be deleted (note the timeline selection that encompasses measure 6). With Ripple Editing Select All, deleting this clip deletes everything in measure 6, so clips that started at measure 7 shift over to the left to start at measure 6 [B]. Note that because cutting deletes the start of a MIDI note (colored yellow for clarity), there is no longer a note-on command and therefore, cutting removes the note.
In [C], measure 7 was selected in the timeline instead of measure 6, and cut. With measure 7 cut, what started at measure 8 now shifts left to measure 7 to fill in the hole. Because the yellow MIDI note’s note-on event is not included in the cut, the MIDI note simply becomes shorter. The note would also have been shortened had measure 8 been cut.
In [D], measure 9 was selected and deleted; note that two MIDI notes were within this region originally—the end of one long MIDI note, and a note-on event for a second MIDI note. Cutting deletes the part of the first MIDI note that’s contained within measure 9, thus shortening it. Cutting also deletes the second note because its note-on event falls within the region being cut.
As to what happens when you insert data with MIDI, refer to [E]. Measure 9 is selected in the timeline, and the clip highlighted in red is ready to be moved two measures to the right so that it starts at measure 11.Note the positions of the MIDI notes highlighted in light blue and yellow. In [F], the material that started at measure 9 now starts at measure 11. Because the yellow MIDI note’s note-on was within measure 9, the note moves along with the other clips. The MIDI note highlighted in blue remains unchanged because there was no cut (moving the blue MIDI note’s end would create a new, and likely unwanted, MIDI note fragment with a note-on starting at measure 11).
Finally, note that ripple editing can also provide some of the functionality of other programs that have arrangement tracks. The difference in Cakewalk is that you either need to Group the clips so they’ll stay together, or select the range in the timeline each time you want to move clips around (as opposed to identify the collection of tracks as a single entity in an arranger view).