Bring back the psychedelic sounds of the 60s with this reverse reverb technique
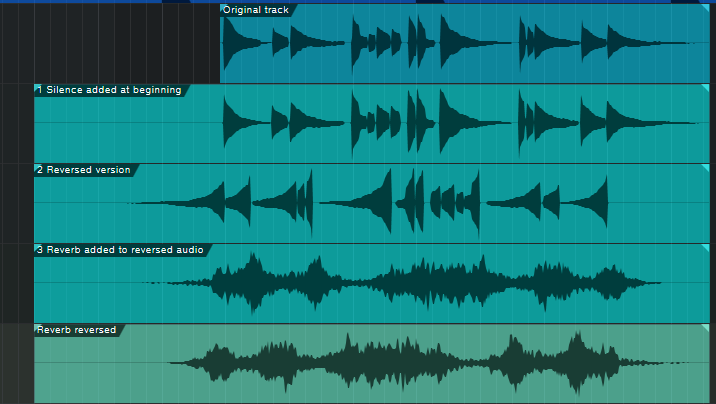
Back when doing reverse audio was a challenge (flipping tape reels over, recording, flipping them back), it was a common a technique. Now that reverse audio is easy to do, it’s uncommon…go figure. But let’s revive reverse audio with preverb—reverb that swells up to a sound, instead of decaying after it. We’ll first look at a method that requires having some silence before the clip to which you want to add preverb, then cover what to do if the clip starts at the beginning of a song. Note: the screen shot above shows each step, but you need to mix together only the top and bottom clips to obtain the preverb effect—the other clips are for illustration only (i.e., you don’t need to keep copying the clip).
Step 1. Start by copying the clip or track to which you want to add preverb. Use a program’s drawing or painting tool to draw a silent section in front of the copied clip that’s equal to or longer than the anticipated reverb decay tail you’ll add in the next step, then bounce the silent part with the copied clip.
Step 2. Select the bounced clip and reverse it. Here are the ways to reverse audio in various DAWs:
- Ableton Live: in the clip overview sample box, click Rev
- Acoustica Mixcraft: right-click the clip > Reverse
- Apple Logic: double-click the clip, then choose Functions > Reverse
- Avid Pro Tools: select clip > AudioSuite > Other > Reverse
- Cakewalk Sonar: select clip > Process > Apply Effect > Reverse
- Magix Samplitude: right-click the clip > Effects (Offline) > Sample Manipulation > Reverse
- MOTU Digital Performer: select clip > Audio > Apply Plug-In > Reverse > Select > Apply
- Presonus Studio One Pro: right-click the clip > Audio > Reverse Audio
- Propellerheads Reason: right-click the clip > Reverse Clips
- Sony Acid Pro: select clip > type U
- Steinberg Cubase: select clip > Audio > Process > Reverse
Insert your reverb of choice into the copied/reversed track or clip, then set the reverb’s Mix control to 100% for an all-wet mix.
Step 3. After your reverb sound is as desired, mix down or bounce the selection. This clip should contain only the reverb sound.
Step 4. Reverse this clip, and now you’ll preverb when you play it along with the original clip. You can also try nudging the preverb left or right to play with the timing.
To add preverb before the entire song starts so that the preverb leads up to the first sound, then select all tracks and shift them to the right to open up a few measures at the song’s beginning. Now you can extend the copy of the track or clip you want preverbed to the project start, so that it includes silence. Continue by copying the original track, reversing, and following the steps detailed previously to add preverb, then shift the tracks back to the their original positions.
To hear preverb in a musical context, go to https://store.cdbaby.com/cd/craiganderton and click on the full-length, free preview of song 2, “The Gift of Goodbye.” The preverb is on the guitar solo toward the middle of the song and occurs again at the end, during the fadeout.